TOOLS REQUIRED FOR DOOR WORK FIXING PROCEDURE & CARPENTRY WORK

BORING TOOLS
Auger, auger bit, center bit, rose a countersunk bit, screwdriver bit, brace, bradawl, gimlet, etc.
CUTTING TOOLS
A compass saw, coping saw, cross-cut saw, hand saw, firmer chisel, mortise chisel, paring chisel, etc.
ALUMINIUM WINDOWS & MARKING TOOLS
Bevel, marking knife, marking gauge, spirit level, square, etc.
HAMMERS
Claw hammer, mallet hammer, spall hammer, waller’s hammer, etc.
PLANNING TOOLS (LEVELLING TOOLS)
Bead plane, jack plane, rebate plane, etc.
OTHER TOOLS
Cramp, nail punch, C-clamp, carpenters T-clamp, oil stone, pincers, pliers, screwdriver, plumb rule, etc.
TYPES OF DOOR SHUTTERS
The types door shutters used for building construction include the panel door, flush door, etc.
Of the various types, flush doors are the most popular. They are widely used for residential and commercial buildings, as they are readily available in the market in standard sizes.
Listed below are the advantages of flush doors.
- Simplicity
- Pleasing appearance
- Clean and uniform finish
- Better thermal and acoustic comforts
- Most economical use of decorative timber
- Can be prepared and supplied on bulk quantity in scheduled time
- Hollow or cellular core type
- Solid core type
It consists of a skeleton/hollow frame with top, bottom, intermediate rails, and stiles. This frame is covered on both sides with plywood sheets. Sometimes this hollow core is filled with light material.
DOOR MANUFACTURING
- The top and bottom rails are tenoned to the stiles.
- Thin intermediate rails (usually 25mm) are stub tenoned to the rails.
- The joints of the frame are glued and clamped.
- The sheets of plywood are glued to the frame under high pressure.
- To ensure the circulation of air within the framing, ventilation holes are provided.
- Lock blocks are provided for the insertion of the lock.
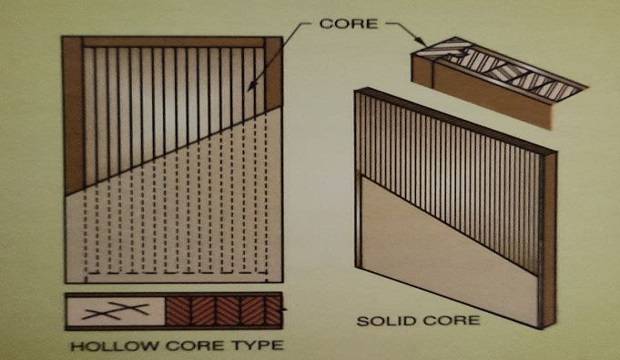
PROCEDURE OF SOLID CORE USH DOOR SHUTTER
- The core consists of 16mm wide strips of seasoned batten.
- The strips are arranged with the grains alternately.
- Strips are glued together under high pressure.
- Hardwood pieces, called edging clips, are fixed on all the edges.
- Stiles and rails for frame-cum-lipping are made of well-seasoned timber of width not less than 50mm.
- The covering may be of plywood, veneer or laminated sheet, as per the decorative requirements.
- The bonding of the covering sheet is done with synthetic resin, under pressure.
- Depending on the bonding material, these shutters can be further classified into waterproof, boiling water-proof, termite-proofing.
CHECKLIST DOOR SHUTTER FITTINGS
- Size of the flush door shutter.
- Make and the brand of the flush door with the ISI mark.
- The thickness of the flush door shutter.
- Stiles and rails for frame-cum-lipping.
- Straightness and uniformity of surface.
- Smooth finishing of edges.
- Whether hot pressed/manually pressed.
- Classification of flush door bonding resin, B.W.P., etc.
- Marking for lock rails.
To check the quality of flush door shutters received on the site, various field tests are carried out.
FITTINGS & FIXTURES DOOR WORK
NAILS
Nails are required in the joining of sections & aluminum sheets over the door. These nails should be G.I. (preferably) 16 gauge. The length varies according to the requirement from 25mm to 75mm.
PANEL PINS
There are two types of panel pins viz. with head & without ahead. The length & gauge of these panel pins being 32mm and 17 gauge respectively.
SCREWS
They are used for fixing various fittings to the door shutter. They may be made of copper, brass, steel, or wrought iron. They are required in sizes of 35 x 8mm, 20 x 5mm, 25 x 6mm.
BONDING RESIN
It is required for joining of sections, fixing of lipping batten over flush door, etc. Various products of good quality ISI marks are available in the market.
Hinges are used to fix the shutter to the frame. There are many types of hinges available in the market. The type to be used depends on the requirement & the pattern of the hinges.
Classification on a material basis
- M.S. hinges
- Brass hinges
- M.S. oxidized hinges
- M.S. or brass chromium-plated hinges
Classification based on pattern types of hinges
- Butt hinges
- Parliamentary type hinges
- T-hinges
- Strap hinges
- Back flap hinges
- Pin hinges
- Counter flap hinges
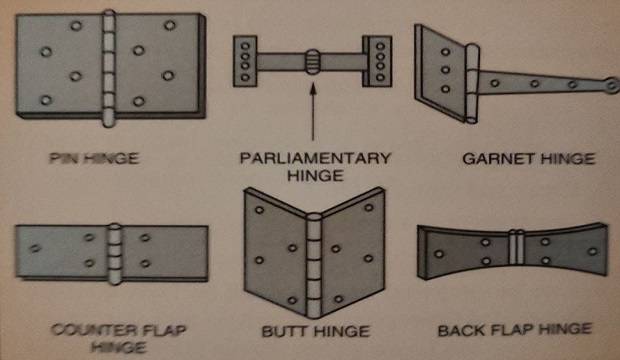
types of hinges
M.S. oxidized butt hinges are widely used for door work fixing procedure shutters. However, for decorative heavy main doors, brass hinges may be preferred. Generally, 4 hinges are used for main doors whereas 3 hinges are used for internal doors. Hinges are available in various sizes & gauges. However 100 x 30 x 30mm (12 G) is widely used (4″ x 1/4+”x1 1/4″).
- Beading patti is the T.W. batten with a thickness of 12 to 20mm and a width of about 30 to 32mm, depending on the thickness of the door shutter.
- Beading patti is fixed to all sides of the door shutter.
- The beading patti provides protection to the door shutter at the end & ensures a plain surface on all exposed edges.
- Beading patti is fixed to the door shutter with panel pins.
COVER MOULDING
UNIT NUMBER PLATE
NAME PLATE
The nameplate is made of mild steel with chromium plating or of any other material as specified. The name is engraved at the center of the plate with a black lacquer painting. This plate is fixed to the
main door with 20 x 5 screws.
HANDLES (Decorative, D-Type, etc.)
Handles are of various sizes, e.g., 10cm, 12cm, 15cm, 20cm (4″,5″,6″,8″) etc. Generally, decorative handles are fixed to the main door from outside, with machine screws.
The D-type handle is fitted from the inside to the main door. The name D-type indicates the shape of the handle (letter ‘D’). This handle is fixed to the main door with machine screws.
ALDROP WITH TWO CATCHES
Aldrop is available in various sizes, e.g., 20cm, 25cm (8″, 10″) etc. Generally, brass aldrop with catches is fixed to the main door from the outside with machine screws.
TOWER BOLT
Generally, the tower bolt is fitted at the top corner of the door shutter, with 20 x 5 screws. Tower bolts are available in various sizes, e.g., 7.5cm, 10cm, 15cm (3″,4″,6″) etc. The tower bolt is fixed to the door shutter, while its catch is fitted to the door frame.
SAFETY CHAIN
The safety chain is fitted to the main door from inside. The safety chain is meant to guard the house from the entry of unknown persons. With the safety chain locked in its latch, the residents can see the person outside, as well as communicate with him through the small gap created between the door frame & door shutter.
Generally, the night latch is provided on the main door. There are different types of night latches, e.g. single locking system, double-locking system, etc. Night latch provides additional safety to the house & can be operated with a key from the outside, without disturbing anyone inside the house.
EYE PIECE
TADI PATTI
RUBBER GATTU RUBBER STOPPER
The rubber gattu stopper is meant to protect the door shutter from banging on the wall. It can be fixed to the door shutter itself or on the wall.
The gap between the door shutter and the wall is maintained with a rubber gattu. It is available in various lengths 5cm, 7.5cm, 10cm (2″,3″,4″) etc.
It also helps to keep the door shutter in position.
BABY LATCH
The baby latch is fixed to the toilet door from inside for locking. Sizes available are 7.5 cm, 100cm (3″ and 4″) etc.
BRASS HOOK
It is provided for hanging clothes, towels, etc. from the bathroom toilet door shutter.

ALUMINIUM SHEET (28 GAUGE)
It protects the W.C., bath & toilet doors from water. The aluminum sheet is also provided to balcony doors as protection against rainwater.
STACKING OF THE DOOR SHUTTERS
Generally, door shutters are received on site in bulk at a time. They are never utilized immediately and have to be stored properly.
Door shutters are stacked size-wise & quality-wise in a horizontal position, resting on wooden battens, one above the other, in heaps, and at least 15cm above the ground. They should never be stacked vertically or in an inclined position as they might bend.
Always lock and seal the store where door shutters are stacked, as shutters are costly & can be stolen easily.
WORK PROCEDURE FOR DOOR SHUTTER FIXING
2. ACTUAL WORK PROCEDURE
- Before plastering, measuring each door frame and check the plumb from inside and outside, for both the stiles. Rectify the frames before plastering, if found out of plumb.
- Ensure that the door frame is in plumb from the outside by loosening its hold-fasts which are anchored in the wall. Then hammer it either from the top or from the bottom to make it in plumb and line.
- For making the frame in plumb from inside, use a wooden wedge, as shown in figure No.
- Once the frame is in plumb, both from inside & outside, measure it from the top, bottom & at mid-span, before plastering.
- Fix T.W. beading patti of 12mm thickness, on all the sides of the door shutter.
- Fix the beading patti without by hammering head ‘panel pins’ at a close distance.
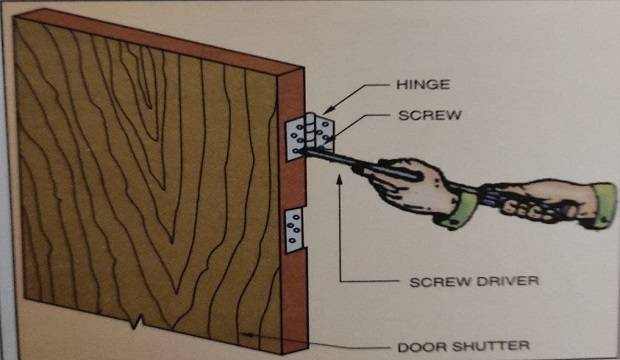
- After fixing the beading patti, complete the marking for the hinges & fix them with just one screw of the required size.
Railway hinges fitting / plus door fixing on the door frame!
- Ensure that the wood primer and one coat of oil paint are applied to the beading patti, before fixing the hinges.
- Note that screws are fixed with a screwdriver and not by hammering into the frame.
- Generally, four hinges are recommended for the main door and three for internal doors.
- Check the door shutter for easy operation, with the minimum equal gap on all sides.
- Mould the shutter with a smoothing plane if the operation is found to be improper between the frame grove and the shutter side.
- Once the shutters are fixed temporarily in their position, ensure that they do not bang against the frame due to the wind.
- After fixing the shutter to frame and before fixing the door fittings in their position, apply a primer coat & the first coat of oil paint.
STANDARD HEIGHTS OF FITTINGS DOOR WORK FIXING PROCEDURE
| SR NO | FITTING DETAILS | HEIGHT FROM F.F.L | POSITION OF FITTING |
| 1. A |
MAIN DOOR INSIDE TOWER BOLT 15CM (6″) |
TOP FLUSH TO TOP OF SHUTTER | 5CM (2″) FROME OPENING EDGE OF SHUTTER |
| B | SAFETY CHAIN | 145 CM (58″) | 5CM (2″) FROME OPENING EDGE OF SHUTTER |
| C | EYE PIECE | 145 CM (58″) | AT CENTRE OF SHUTTER |
| D | HANDLE D TYPE BOTTOM | 120 CM (48″) | 6.5 CM (2 1/2″) FROME THE OPENING EDGE OF THE SHUTTER |
| E | NIGHT LATCH | 100 CM (40″) | OPENING EDGE OF SHUTTER |
| F | TADI PATTI | 85 CM (34″) | AT THE OPENING OF EDGE |
| G | RUBBER GATTU | 7.5 CM (3″) | 7.5 CM (3″) FROM OPENING EDGE SHUTTER |
| 2. A |
OUTSIDE UNIT NUMBER PLATE |
175 CM (70″) | CENTER OF SHUTTER |
| B | NAME PLATE | 167.5CM (67″) | CENTER OF SHUTTER |
| C | DECORATIVE HANDLE BOTTUM | 110 CM (44″) | 7.5 CM (3″) FROM THE OPENING SIDE EDGE OF SHUTTER |
| D | ALDROP | 90 CM | AT THE OPENING EDGE |
| E | DOORSTOPPER | AS PER REQUIREMENT | AT THE OPENING EDGE |
STANDARD WORK OUTPUT (TASK WORK)
- For fixing one main door with fittings, including night latch fixing –> 1.5 carpenter and 2 helpers are required.
- For fixing internal doors with fitting per unit -> 0.5 carpenters and 1 helper required.
- For cutting and fixing G.I. sheet for W.C./bath/toilet per 100 s.ft. –> 2.5 carpenter and 2.5 helpers.
- For fixing cover moldings per 100 r.ft. –> 1 carpenter and 1 helper required.
PRECAUTIONS TAKEN WHILE FIXING DOOR SHUTTERS
- Door frames should be in proper plumb & level.
- Quality of door shutters should be good. Warping of surface i.e. formation of the wave pattern on the surface of shutter & broken edges of the shutters should be avoided.
- Shutters with bends at the corners should be rejected.
- All hinges & other door should be fixed with screws. The hammering of nails should be avoided.
- Primer, putty & first coat of the oil paint should be completed before fixing any fittings on the shutter.
- Once the shutter is fixed, there should be just the nominal gap between the shutter & frame, required for working tolerance.
- Beading should be fixed to three sides before fixing the shutter.
- No joint should be provided to cover moulding except at the corners.
- All visible dents, scratches, unevenness, etc. should be properly repaired by applying putty made from wood dust & resin. It should be properly scraped with sandpaper.
- As soon as the door shutter is fitted, fix at least one aldrop per shutter for locking, to prevent the shutter from banging on the door frame due to wind.