In this chapter, we will study the tools required for waterproofing work procedure, working procedures and stages of work for W.C., bathroom, terrace sloping roofs, water tanks, basement, swimming pools working procedure for pressure grouting, repairs and maintenance in water-proofing, use of Chemicals for waterproofing work procedure, precautions and. care to be taken, water-proofing for expansion joints, etc.
MATERIAL REQUIRED FOR WATERPROOFING WORK PROCEDURE AND IT’S SPECIFICATIONS
The following materials are generally used for water-proofing work
1. CEMENT
Ordinary Portland Cement is used for all water-proofing works. For detailed specifications refer
2. SAND
The clean river sand should be used for water-proofing work. If muddy, the sand should be washed before use. For detailed specifications.
3. METAL
The hard angular metal of size varying from 12mm to 20mm size is used for the water-proofing work. For detailed specifications refer
4. BRICK BATS
Brickbats shaped like half brick or more should only be used for waterproofing work procedures. Very small pieces of bricks should be rejected. For detailed specifications.
A number of chemicals and waterproofing compounds in powder form are available in the market. The best out of the lot should be selected for mixing in cement while during waterproofing work procedure.
6. GERU RED COLOUR
For a colored finish to water-proofing treatment, especially for terraces, color pigments are used in cement for the topcoat. For this, geru red color pigments are used.
7. SHABAD TILES
25mm to 40 mm (1″ to 1″) thick rough Shahabad tiles of size 60cm x 90cm (2’0″ x 3’0″) are used for the box-type treatment of water-proofing to the basement. For detailed specifications.
8. G.I. Sockets
25 mm (1″) with 1.5 m to 2m (5′ to 7) long pipe.
Waterproofing Checklist Pdf free Download Link Below

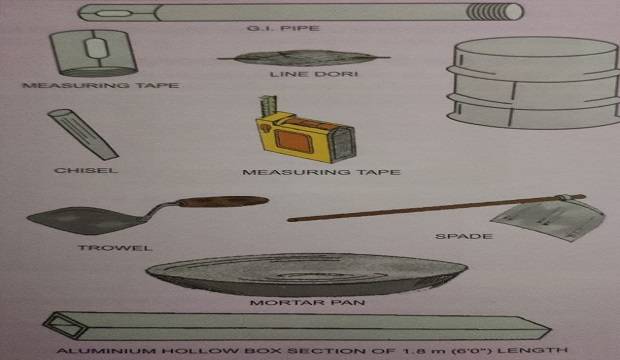
TOOLS REQUIRED FOR WATER-PROOFING WORK
The following tools are generally used for waterproofing work procedure
- 25 mm G.I. sockets
- Trowel (thapi/nayala)
- Wooden float (randha)
- Plumb bob (olamba)
- Line string (dori) and red color (for marking)
- Metal float (tipani)
- Hammer chisel (chhinni)
- Hacker (tacha)
- Screens for sieving the sand
- Spade (phauda)
- Mortar pan (ghamela)
- Right angle
- Ladder
- 2.0m long ruler
- Wooden mallet
- 15 cm (6″) brush
- 3.0m (10′.0″) tape
- 1.5m to 2.0m long G.I. pipes of diameter
- 40mm, 50mm (1-“, 2”)
- Pressure grouting machine (if required)
- Measuring boxes (farma)
- M.S. tray
- G.I. bucket
- Plastic mug
- Barrel (drum)
- Arrangement for plastic paper/tarpaulin
- Level tube
- Spirit level
- Scaffolding material
WATER CLOSET (W.C.) WATERPROOFING WORK PROCEDURE – STAGES OF WORK WATERPROOFING
PREPARATION FOR W.C. WATER-PROOFING
The pre-work should be completed before starting any waterproofing work procedure as follows
- Completion of internal plaster of walls, leaving a margin of 18″ from the final floor level of W.C. unit.
- Completion of grooving chasing for concealed G.I. piping electrical conduit piping in W.C.
- completion of all concealed G.I. and electrical work in W.C.
- Removing of all debris from W.C. and chiseling the extra mortar, if any, to expose the rare slab completely.
- Completion of making holes in external walls for connecting nahani trap, P-trap, floor trap, etc. to the external drainage line.
- Thorough cleaning of W.C. with a sufficient quantity of water.
- Level marking in red color on walls, with respect to floor level to set-up trap level.
In the case of leakages in the base slab, socketing work should be done in the following manner
- Fill up the W.C. slab with 7cm of water (after plugging trap hole), preferably a day before.
- Keep the slab filled with water overnight (i.e. for at least 12 hours).
- Check for any leakages in the base slab or underneath, the next morning.
- If a major leakage is observed, locate the spot with porous concrete and provide a socket for grouting. In addition, provide four sockets at each corner of the slab. Grout the sockets with cement slurry, with a consumption rate of 1 bag of cement to 75 to 100 liters of water.
- To spread the slurry in the porous portion of the concrete, it is required to flow the slurry with velocity. It can be achieved by passing the slurry through G.I. pipe with a head of about 1.5m to 2.0m or by using the pressure pump.
- If there is a minor leakage in the base slab, put the cement slurry (rala) directly over the base slab with the help of a trowel and brush to spread this slurry all over the base area of W.C.
- It is further understood that the process of socketing and grouting is to be continued until the leakage in the base slab is totally stopped. After completion of cement grouting and testing for leakages, remove the sockets.
 |
| jointing details wc pan |
Carry out this base coat on all walls, up to a height of 45cm (1′ 6″) above the toilet finished floor level. It should cover all beam tops, junctions, etc. properly.
It should also be carried out up to the outer face wall line at the entrance door and the hole made in a wall, for the outlet pipe to join the P-trap to the vertical stack.
Keep this base coat full with water up to the slab drop-top, for a minimum of four days for curing and testing purposes.
After four days, get it checked and certified, for proceeding with the further stages.
Provide 25 mm (1″) G.I./P.V.C. pipe for the water escape outlet just above the base coat in W.C. (holes of such pipes should be made prior to the base coat. over this base coat, instruct the plumber to fit P-traps in the required level along with P.V.C./C.I. outlet pipe.
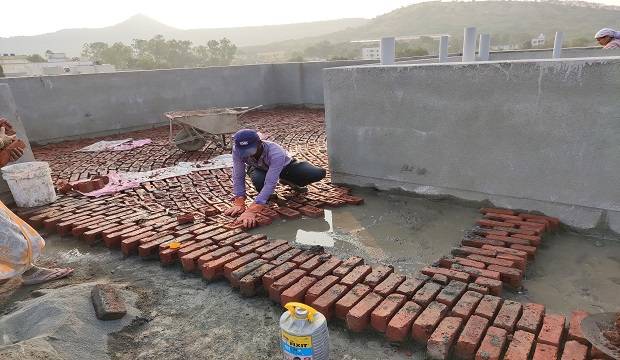
BRICK BAT COBA COAT FOR W.C. WATER-PROOFING
B.B. Coba work should be carried out as per the following procedure
- Select well-burnt (pucca) brickbats. The use of overburnt brickbats should be strictly avoided.
- Before laying brickbats, soak them thoroughly in water, for at least half an hour.
- Lay the pucca brickbat on the edge (Kodi) and not on a flat surface.
- Any gaps between the brickbats should be filled with mortar. Complete the brick-bat Coba coat with joints filled with cement mortar in 1:6 proportion. Also use the water-proofing compound as per the specified dose per bag of cement, while filling the joint.
- Give the slope of 1:100 in brickbat Coba coat from the entrance door to the water escape pip.
- All the holes made in the wall for P.V.C./C.I. pipe connections should be finished with waterproofing coba along with this coat.
- Cure this coat by ponding water for four days and checking for any leakages.
 |
| details bathroom waterproofing |
- After curing of the B.B. Coba coat, complete the topping coat with 1:4 cement-mortar mixed with water-proofing compound (as per the given per bag ratio in the literature of product) Finish this coat properly with neat cement slurry by metal float (pan).
- Roughen the surface with a wire brush, for bonding of the horizontal filler coat. Continue this coat on the sidewalls, up to 45cms (18″) above the W.C. floor level.
- This coat should not project out beyond the plastering coat of the W.C. walls, so as to avoid unnecessary thickness of the glazed tile dado.
- Cure this final coat for a minimum of seven days, with water up to a minimum of 7.5cm (3″) depth.
- Fix W.C. pan at the required level, considering 15 mm sunk from the floor level.
- Block the P-trap outlet hole with gunny bags and fill the W.C. pan with sand to prevent any damage by the water-proofing workmen. Check the W.C. pan for its center.
- Fill the extra gap around W.C. pan over the topping coat, with brickbat and mortar in a layer up to a minimum of 7.5cm (3″) below the top of I.W.C.
- Allow curing for a minimum of three days.
- The final topping coat should be done up to 50mm (2″), below the top of I, W.C. with a slight slope towards the W.C. pan.
- Roughen the topcoat surface with a wire brush, to receive tile mortar with the required bonding.
- Continuous curing should be done for a minimum of seven days with wet gunny bags.
- All the joints of the P-trap, flush pipe, connection to vertical line, etc. should be properly joined.
BATHROOM TOILETS WATERPROOFING WORK PROCEDURE
- After completion of the internal plastering of walls, keep a margin of 450mm (18″) from the final floor level of the bathroom.
- Roughening of the plaster should be done with a wire brush for fixing the glazed tiles cladding dado.
- Complete grooving, and chiseling for concealed G.I., and electrical conduit piping in the bathroom.
- Complete all concealed G.I. and electrical work in the bathroom.
- Remove all debris from the bathroom after chiseling the extra mortar, if any, to expose the slab completely.
- Make the holes in the external walls for connecting nahani trap to the external drainage line and water leakage drain pipe.
- Clean the bathroom thoroughly with water.
- Mark the level in red on the walls, with respect to the floor level, to set up the trap level.
If required, socketing should be done in the same way as explained for the socketing of the W.C.
After stopping any leakages in the base slab, provide a 15 to 25mm thick cement mortar base coat in the proportion of 1: 4 with a slope of 25mm. (1″) in 3m (10′-0″) from the entrance door towards nahani trap.
This base coat should cover all the walls around, up to the outer face wall line at the entrance door and the bottom portion of the nahani trap connection hole made in the wall.
Flood this base coat with water, up to the slab drop, for a minimum of four days, for curing and testing. Due care should be taken to plug the nahant trap opening.
Fix the nahani trap and water escape pipe leakage drain pipe over this base coat. Also, lay all the concealed pipes such as G.I. outlet pipe for washbasin, etc.
- After curing the brickbat coba coats, complete the topping coat using 1:4 cement mortar mixed with waterproofing compound, with a proper slope from the entrance door to the Nahanni trap.
- Finish this coat with cement slurry using a metal float/polish Patra. Roughen the top coat using a wire brush (or a bunch of binding wire), to receive tile mortar bonding.
- Ensure that this coat on walls does not project beyond the bathroom wall plastering coat. Projected water-proofing will ems at the time of bathroom dado tile fixing pose a problem at the time of bathroom dado tile fixing work.
- Cure this final coat for a minimum of seven days with standing water (minimum 7.5cm depth).
3. TERRACE WATERPROOFING WORK PROCEDURE
PREPARATION FOR TERRACE WATERPROOFING
- Chisel the extra mortar accumulated on the chisel and hammer.
- Clean the terrace thoroughly with water. Add one bag of cement to a hundred liters of water. Stir the mixture to get a consistent cement slurry. Spread this slurry on the terrace and allow it to penetrate uniformly over the cleaned surface.
- Check the grading of the sand and its silt content before using it for water-proofing.
- Check the terrace door level and ensure that enough margin (approx. 15cm) for waterproofing is left from the bottom side.
- Check the level marked with red chalk on the parapet wall, all around:
- Ensure that the rainwater pipe outlet is bent in the correct position.
- Stack well-burnt brickbats on the terrace.
- Check M.S. tray, required for the mixing of mortar.
- Ensure that provision for plastic paper/tarpaulin is made to protect the water-proofing from occasional rains.
- Soak brickbats in water before use.
- Fix (line Dori) in a slope 1:150, starting from the lowest point of rainwater down-take and by keeping a minimum thickness of 65mm (2 1/2″), below the rainwater outlet.
- Fix brickbats in the cement-mortar layer of 1:6 proportion in a slope of 1:150 with the waterproofing work procedure compound.
- Fill the cement-mortar 1:4 with the water-proofing compound in the brickbat joints.
- If the work is incomplete at the end of the day and a joint is required for the next day’s work, provide brickbats in a staggered manner and avoid continuous horizontal joint of the mortar.
- Fix small pieces of brickbats along with 20mm (3/4″) metal for coving of watta (rounding) at the bottom of the parapet wall.
- Special care should be taken for achieving the round shape near the rainwater pipe.
- Block the rainwater outlet with gunny bags.
- to avoid cement slurry from entering it.
- Cure the brickbat Coba coat for at least seven days.

FINAL COAT FOR TERRACE WATERPROOFING WORK
- Spread cement mortar in 1:4 proportion, along with the water-proofing compound over the brickbat coba.
- Press the cement mortar with a ruler of the length of 2m.
- Level the surface with a wooden float, keeping 25mm (1″) thickness.
- Apply thick cement slurry over the leveled surface, along with the water-proofing compound for a smooth finish (ghotai).
- Polish the surface with metal float, i.e., (polish patra).
- Make vertical and horizontal lines at an interval of 30cm x 30cm (12″ X 12″), using a cotton line Dori of minimum 3mm thickness so as to avoid cracking of the top layer.
- Make the projected edge (Kani) between the parapet plaster and the watta on the second day.
- Clean and cure the final coat for 21 days with at least 6″ water standing on the waterproofing.
4. SLOPING ROOF & CHHAJJAS
CHHAJJA WATERPROOFING WORK PROCEDURE
- Clean the top of the chhajja and chisel extra mortar, if any.
- Apply a thick cement slurry over the top of the chhajja.
- Apply 1:1-3 metal screen coat.
- Make rounding (watts) at the junction of chhojja and the wall of the building.
- Cure this coat for seven days.
- Apply a finishing coat with C.M. 1:4 with a waterproofing work procedure compound.
- Apply cement slurry with the water-proofing compound for a smooth finish (ghotai). Polish with a metal float and make an impression with a 2mm diameter cotton line Dori , to avoid cracking.
- Cure the waterproofing for at least seven days.
 |
| details chajja waterproofing |
The following sequence of work should be carried out for a sloping terrace.
- Clean the surface of the sloping terrace chhajja.
- Apply a thick cement slurry over the surface of the slab.
- Apply 1:1-:3 metal screen coat.
- Cure this coat for at least seven days, by putting wet gunny bags on it.
- Over this coat, apply a finishing coat with cement sand mortar 1:4 and water-proofing compound as per the design.
- Finally, apply the cement slurry with a waterproofing work procedure compound. Add color pigments such as red, green, etc. as per the requirement for an attractive finish.
- Make an edge between the parapet and the sloping slab on the second day.
- Cure this waterproofing for fifteen days, with wet gunny bags spread over it.
- Constant watering is required on a sloping slab.
5. BASEMENT, SWIMMING POOL, AND UNDERGROUND DUCTS BOX TYPE WATERPROOFING WORK PROCEDURE
INTRODUCTION
Following is the procedure for carrying out this water-proofing.
BASEMENT SWIMMING POOL WATERPROOFING WORK PROCEDURE
- Carry out the work of P.C.C. bed and provide a cement mix 1:4 base coat, with the water-proofing compound in the required proportion and above this fix, Shahabad tiles of size 60cm x 60cm (2’0″ x 2’0″) or 60cm x 90cm (2’0 x 3’0″) with a minimum required width of a joint between the two tiles.
- Ensure that all four sides of the Shahbad tiles are cut manually to retain a fairly straight edge. Also, check the thickness of the Shahbad tiles. It should be between 32mm to 40mm (1 1/4″ to 1 1/2″).
- Maintain the break joint pattern while fixing the Shahabad tiles for the base.
- After fixing the Shahabad tiles, grout the joints with cement slurry completely.
- Seal the joints between the Shahabad tiles with the help of C.M. 1:3. Add some 15mm metal to this mortar, for enhanced strength and less shrinkage.
- Over this, apply a joint less layer of C.M. 1:3, approx. 25mm thick and cure it properly for 7 days. This layer provides a smooth base for the raft and protects the Shahbad bas the movement of labour and steel bars laid for the raft.
- Generally, all the conducting and piping is completed before casting of the raft slab.
- For the basement, the provision of gutter and sump is made in P.C.C. itself and Shahabad base is also prepared in the same fashion. The gutter is given a proper slope towards the sump. This provision is a preventive measure against the occasional entry of rainwater in the basement.
- Over the plastered Shahabad base, raft slab is cast and the R.C.C. pardies are erected.
- Rough Shahbad tiles are then fixed to the vertical pardi from the outside. Apply neat cement paste on the four corners and in the center of the 25mm (1) Shahabad tile, Press this tile firmly over the R.C.C. pardi in line and level.
- At one time, fix only a height of 1.0m. The total height of the dado, above the existing ground level, is taken as 450mm (18″).
- The joints in the vertical Shahbad are then sealed with the 1:2 cement mortar. This is known as pointing.
- The Shahabad dado is then grouted using cement slurry with a water-proofing compound. Add approx. 1 bag of cement in 100 liters of water, to prepare the cement slurry, Continue to pour cement slurry, every day, for three to four days, until the backside of Shahabad is
- complete. filled with cement slurry and no more slurry is absorbed.
- Cure it for at least seven days, a minimum of ten times a day.
- After curing, provide the final jointless waterproof plaster coat in C.M. 1:4 over the rough Shahabad.
- The entire process mentioned above forms a box around the structure and does not allow any water to seep through or leak from the basement. The thickness of this treatment shall be 65mm to 75mm.
 |
| basement waterproofing |
NEED OF ADDITIONAL MEASURES FOR BASEMENT WATERPROOFING
Due to the rise in the water table and the upthrust of the water pressure from below, the water-proofing measures for the basement may sometimes fail and damage the basement.
Additional measures to protect the basement are carried out for large projects or commercial complexes as detailed below.
PROCEDURE OF CONSTRUCTION BASEMENT WATERPROOFING
- A pathway of size 0.6m to 0.9m width is proposed, with compacted impervious material with specified flooring on the top.
- The area beyond this pathway is excavated to form a trench throughout the periphery of the basement.
- The highest level of the trench is kept at least 0,15m (6″) below the bottom of the basement. The perforated pipes, of about 0.45m (18″) in diameter, are laid in gradual slopes.
- The joints of these pipes are kept open.
- The collecting chambers are constructed at suitable intervals and at turning points.
- The collecting chambers are not plastered from the inside or outside, to receive water from the surroundings.
- The perforated pipes are then covered with loose materials like chips and metal, to form a filter media.
- The size of the filling material goes on decreasing toward the ground level.
- The underground water finds the way of least resistance through the filter media.
- The water is collected in the perforated pipes through the filter media.
- Due to the slopes provided, this water is further collected in the chambers in between.
- All the water thus carried away. is finally collected in the deepest chamber or sump.
- The water collected in this sump is either pumped out or laid into the public stormwater drain.
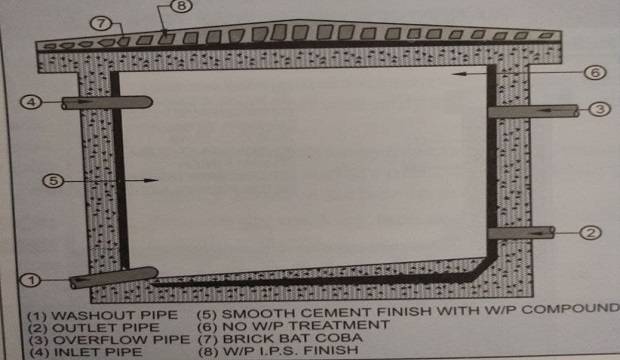
6. UNDERGROUND WATER TANK WATERPROOFING WORK PROCEDURE
The procedure for the underground water tank is the same as that of the basement, except for the following points.
- A provision for a pump sump is made, instead of the gutter arrangement.
- The overflow pipe is located at the desired level, to drain out the excess water.
- Check this pipe for its tightness before the waterproofing work procedure.
- This pipe, along with the inlets and outlets, is fixed in pardi at the time of concrete, so as to avoid the breaking of the pardi at a later stage.
- Care should be taken to waterproof the top slab of the water tank.
7. OVERHEAD WATER TANK WATERPROOFING WORK PROCEDURE
- Chisel the extra concrete in the tank, particularly in the corners around the chambers.
- Clean the entire tank, along with the bottom slab and sidewalls, and throw away the debris.
- Allow the cement slurry to penetrate all holes, and cracks of the bottom slab.
- Check the hacking (tacha) of the vertical walls from the inside for better bonding with the waterproofing work procedure.
- Check the inlet, outlet, and washout pipes for their rigidity. If the pipes are not rigid, grout them to achieve the desired fixity. Before grouting, check the levels of these pipes and if necessary, correct them by shifting the pipes accordingly.
- Apply water-proof plaster in C.M. 1:4, by adding a water-proofing compound. Apply 15 to 20 mm (1/2″ to1/4″ ) metal over this plaster, particularly on the corners and base for avoiding shrinkage and to achieve better strength.
- The bottom of the top slab does not require waterproofing.
- The top of the overhead water tank is to be finished with brickbat Coba, as mentioned for terrace water-proofing.
- Allow water-proofing to set for at least 12 hours.
- Cure this waterproofing for a minimum of fifteen days.
PROCEDURE FOR GLAZED CHINA MOSAIC KAVADI TYPE WATERPROOFING FOR TERRACE
1. INTRODUCTION
2. MATERIAL REQUIRED
Apart from the material required for brickbat Coba type of water-proofing, given below is the list of additional materials required for glazed china mosaic type of water-proofing work.
| SR NO | MATERIAL | APPROX QUANTITY |
| 1 | PIECES OF GLAZED TILES | 135 KG |
| 2 | LIME | 1.30 BAG |
| 3 | FINE SAND | 0.45 CUM |
| 4 | GREY CEMENT | 2.00 BAG |
| 5 | WHITE CEMENT | 0.5 BAG |
- Pieces of the glazed tiles, i,e, china mosaic
- Lime
- Fine sand
- White cement
- Colour pigment
- Sawdust
For 10 sq.m. of the china mosaic work, the following quantity of material is required (Excluding the brickbat Coba layer)
3. SURFACE PREPARATION
The brickbat Coba type of water-proofing is carried out as discussed earlier for the terrace, except for the final coat of finishing. Instead of finishing the final coat with cement slurry, it is roughened to receive the china mosaic treatment.
4. WORK PROCEDURE
- The roughened top coat of brickbat Coba is cleaned & washed properly.
- Lime mortar made from lime & fine sand in proportion of 1:5 is spread uniformly on the surface with a thickness of 20mm to 25mm
- uniformly. This is left to harden for a day.
- This bed (machan) is checked for levels & slopes.
- Design pattern, if any, is marked over this bed (machan) with the use of cotton line string (Dori).
- Water is sprinkled on this machan and dry cement is spread on the work area for 15 minutes. Pieces of china mosaic are then pressed & fitted in position. The joints between these two pieces shouldn’t exceed 3 to 4 mm.
- After laying off the china mosaic pieces, they are hammered with a wooden mallet to achieve a uniform surface.
- The surface is cured for at least 3 days.
- If white or colored joints are required, then the grey cement joints are raked, and white cement or color cement slurry is applied with a small travel over the surface for joints of a matching color.
- The surface is again cleaned with sawdust. to remove excess white or color cement sticking to the glazed china mosaic surface.
- Completed work is then cured for 15 days.
- China pieces being impermeable, the top surface becomes impermeable.
- The possibility of the development of hairline cracks due to temperature variation is reduced considerably.
- China mosaic pieces reflect the rays of the sun, keeping the slab cool.
- ‘It is easy to clean and maintain and gives a good appearance.
WATERPROOFING FOR THE EXPANSION JOINTS
1. INTRODUCTION
Expansion joints are generally provided in the structure, after every 50m.
Expansion joints are classified as
- Vertical expansion joints.
- Horizontal expansion joints.
2. SURFACE PREPARATION FOR EXPANSION JOINT WATER-PROOFING
- Clean the joint surface of dust, cement mortar, etc.
- Remove oil and grease (if any), from the surface.
- Protect the edges of the joint with masking tape, from the overfilled sealant material.
- Keep the tools like suspended scaffolding (zula), ladder, spatula, putty knife, handheld gun equipment, etc. ready.
 |
| waterproofing details for horizontal and vertical expansion joint |
- Primer is applied in the joint, in accordance with the type of the joint, e.g., for surfaces like concrete, masonry, etc.
- After the primer dries completely, the sealant is prepared by mixing the base and accelerator. Mixing should continue until a uniform color is obtained.
- The base and accelerator are mixed together in proportion by weight.
- This mixed compound is then applied with a spatula or handheld gun equipment wherever required. Extra material is cut off with a putty knife and a smooth vertical joint is created.
- Since the sealant is very expensive, use it. economically. The outermost surface of the sealant should present a slightly concave surface in profile.
- Remove the masking tape and clean the surface with suitable solvents.
4. HORIZONTAL EXPANSION JOINT AT TERRACE LEVEL
For water-proofing of the horizontal expansion joint, arrangements should begin from the R.C.C. stage of the building.
The following procedure should be observed.
- Inverted beams are taken to the location, for the expansion joint, side by side.
- A cantilever chhatja is provided from the beam, which is on the rain side as shown in the figure.
- Shuttering of the beams is done from one side. Between the two beams, pre mould bituminous sheet is placed.
- Pre mould bituminous sheet is also placed beneath the cantilever chhajja.
- The far end of the chhajja is sloping downwards, for easy drainage of water.
- The system is water-proofed with brickbat coba.
- Where the parapet walls meet, the same techníque is used and an
- lever slab is projected, to protect the joint from rains.
WORK PROCEDURE FOR SOCKETING
Socketing (pressure grouting)’ is a procedure to grout the cement slurry by pressure into the porous concrete member. For stopping undetected leakages in toilets, terraces, and the basement, this method is generally used.
Following a sequence of the work procedure. is observed.
- First, clean the surface where socketing is to be done.
- Chisel a portion of the porous concrete, but not more than 25mm (1″).
- Place 20mm (3/4″) metal over the chiseled portion, as a filter media.
- Fix 25mm (1″) G.I. socket over the metal, using rich cement mortar around the socket and metal.
- Allow 24 hours for the mortar to settle and the tight fixing of the socket.
- Proceed with grouting using a diameter G.I. pipe of length 1.5 to 2.0m.
- Grouting should be done with cement slurry of the required viscosity. For smooth flow, add 1 bag of cement to 75 to 100 liters.
REPAIRS AND MAINTENANCE IN WATERPROOFING
If the waterproofing work procedure is not done properly, it can pose problems. Repairs and maintenance of waterproofing can prove very troublesome for the user. Following are the methods of repairs and maintenance of the waterproofing
1. WATER CLOSET REPAIRS
- The joint between the C.1/P.V.C. piece and P trap.
- The joint between the (tee) of outer vertical stack and P.V.C./C.I. piece.
- The joint between the P-trap and I.W.C. pan.
- The joint between the flushing pipe and I.W.C pan.
- All these joints should be sealed with the proper sealant, at the respective stages during the execution of the work.
- For any leakages from W.C., locate the point of leakage before deciding the course of action. Breaking the tiles and water-proofing
- should be avoided before the leakage is traced out.
- Following is the sequence of the procedure to be observed –
- Mostly leakages occur through W.C., waterproofing work procedure, from plumbing pipes & fittings.
- First, check the lowermost water escape pipe, (drain pipe) for its operation. If it is in working condition, leakages rarely occur as water escapes through this release pipe.
- If this pipe is choked, then clean it with an iron bar from outside. Also, fill all the gaps in the flooring of W.C. with cement.
- Check the joint between the P-trap and L.W.C. pan from above, by inserting a hand into the trap. Seal this joint with M-seal, if it is partially open.
- Check the joint between the flushing pipe and L.W.C. pan by breaking only one tile, fitted exactly over the junction. Seal this joint properly with M-seal.
- Open the “Tee’ of the vertical stack from the outside, with a ladder or zula and observe the joint of C.I. piece and Tee’ with torchlight and seal it properly.
- If leakage still persists, break open the concealed flushing G.I. pipe and check if it is watertight. Replace the leaking pipe/G.I. fitting.
- If this does not stop the leakage, break open the complete unit and check the joint at the P-trap and C.I. /P.V.C. pipe. Do the new waterproofing work procedure completely with utmost care.
- Generally, 90% of leakages stop, if we carry out the repair work as stated above, in the first four points.
2. BATHROOM REPAIRS
The bathroom is the most affected area.
Following is a sequence of investigations
- Check the gap between the nahani trap and the bathroom floor and fill it properly with cement.
- Check all floor tile joints. Refill the opened joints with cement slurry.
- Check the leakage drain pipe/release pipe for its proper working. Clean, if it is choked.
- Check all the concealed pipes under the flooring. like the basin drainpipes, for their water tightness. This can be checked by stopping the operation of the wash hand basin and keeping these lines completely dry and operating them again after 4-5 days.
- If the leakages dry out and start, the source is through these lines. Break open the lines and locate the source and replace the affected part.
- Check all the concealed pipelines, as stated above.
- If leakages still persist, try socketing and grouting of cement slurry in the affected portion.
- Finally, break open the bathroom waterproofing work procedure and re-do it carefully.
3. TERRACE REPAIRS
- A common and successful method for treating minor leakages is to treat the affected portion with cement slurry. Apply the cement slurry from the top and let it penetrate in the cracks through the top portion.
- Try the socketing method of cement slurry grouting.
- Check the affected portion of the terrace using a wooden mallet and check if it has peeled off. Remove the loose portion with a chisel and hammer. Re-do it carefully.
- If the leakage is from the corners or from the parapet wall, then fill all the cracks after breaking it open with cement.
- The best method to avoid leakages in the parapet wall is by casting R.C.C. cornice over the parapet wall.
PRE-MONSOON PRECAUTIONS TO AVOID LEAKAGES FROM TERRACE
Following precautions should be taken before monsoon for avoiding leakages,
- clean all the rainwater drain pipes.
- Clean the terrace completely and do not allow any loose rabbit, the organic material to remain on the terrace.
USE OF CHEMICALS WATERPROOFING WORK
Waterproofing chemicals are used extensively.
The water-proofing compounds can be basically bifurcated as into –
- Tar bitumen-based compounds
- Inorganic compounds with little percentage-
- age of chlorides and sulfates
- Acrylic-based compounds
- Epoxy resins
- Polysulphides
- Polyurethanes
- Silicones
Waterproofing compounds are generally available in powder and liquid form, as they serve the dual purpose of waterproofing work procedure and heat insulating.
CHECKLIST WATERPROOFING WORK
- Ensure that all the material used is of good quality.
- Ensure that the socketing is done before the base coat work.
- Ensure that there is no leakage from the bath W.C. slab once the socketing is done.
- Ensure that the traps and release pipes are fixed properly before the brickbat coba coat.
- Ensure that all the brickbats are well-soaked in water, before use.
- Ensure that all brickbats are placed on the edge and not flat.
- Maintain a proper gap between the brickbats.
- Check the slope of the brickbat coat, towards the trap.
- Ensure that the water-proofing compound is mixed in the mortar, for every stage of work.
- The topcoat should be carried out in one stroke, without any joints.
- Ensure proper finishing near traps and spouts.
- Ensure that the mouth of the release pipe is well tied with a piece of chicken mesh ‘and a ghamela of metal is spread over it, for maintaining the porosity.
- Check each stage for leakage, by flooding it with water.
- Cure the waterproofing without interruption.
- Ensure that 30cm x 30cm (1’0″ x 1’0″) squares are marked with line dori on terrace waterproofing.
- Check that water-proofing of the terrace is cured with the ponding method.
- Ensure that all the joints of traps and W.C. pan are sealed properly before filling the gap with brick-bat coba.
- Ensure that a hole is made in the wall, for the release pipe, and the drainage outlet is waterproofed before fixing the pipes.
- Ensure that vertical water-proofing over dado is continued up to a sufficient height.
- Ensure that watta is made immediately the next day and cured properly.
- Ensure that the rough Shahabad dado is in plumb, for box treatment of water-proofing.
- Ensure that the gap between the vertical wall and Shahabad dado is fully grouted with cement slurry.
- Ensure that the vertical Shahbad dado is plastered in C.M. 1:4. Ensure that the peripheral area of the basement/underground water tank is refilled with hard, porous material for easy drainage of the rainwater groundwater.
nice content and blog setup. Can you help me to get such theme?
Thank you so much for the great article, it was fluent and to the point. Cheers.