From the architectural and engineering point of view, the plinth beam work procedure is the most important activity building construction.
All the peripheral and internal room dimensions are to be checked at this stage of the work and offsets and projections of the building are to be confirmed.
The efficiency and accuracy of the engineer-in-charge are judged at this level.
Mistakes committed at plinth beam work procedure cannot be rectified at a later stage.
 |
| PLINTH BEAM WORK PROCEDURE |
Therefore, during the plinth work maximum is expected of all the personnel concerned.
Generally, project buildings are divided into two parts.
- Parking side
- Plinth side
In parking, the place is kept vacant for vehicular movement.
While in the plinth, residential construction is planned. Hence, all plinth work is to be completed before taking any R.C.C. work above the plinth area.
- The casting of columns up to the plinth level.
- Constructing rubble/brick masonry up to the plinth level.
- The casting of plinth/tie beams at the designed level.
- Anti termite treatment in foundation.
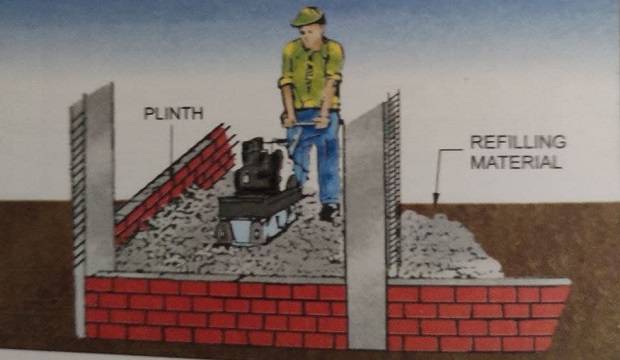
- Refilling of column pits and plinth with selected material.
- Soling over the compact refilled material.
- D.P.C. over plinth walls.
- Floor P.C.C.
- Plinth protection.
In this chapter, we shall study the procedures for execution and the precautionary measures to be taken during execution.
CASTING AND CHECKING OF COLUMNS UP TO PLINTH
-
- After casting of footings, mark the centers of respective columns on the footing.
- Erect the column cage by checking the number of bars, the diameter of the bars, spacing, and the type of links (rings).
- Provide the length of column bars up to the beam level, considering the appropriate lap length of the bars.
- Cast the column up to the plinth level or up to the bottom level of the tie plinth beam work procedure.
- Check the proper covering for column reinforcement.
- Check the unsupported height of the column for slenderness, from footing top to bottom of the beam. If the height is beyond limits, inform the Structural Consultant and provide an intermediate tie beam.
- Check the offsets of the column as per the drawing.
- Check the mix before casting.
- Maintain a proper water-cement ratio.
- Compact the concrete by a needle vibrator.
PLINTH TIE BEAMS WORK PROCEDURE – CASTING AND CHECKING
- The plinth level is first finalized with respect to the parking ground level.
- The plinth beam work procedure can be cast by adopting the usual procedure of propping and shuttering.
- Tie beams may be cast on masonry work at the plinth level. The only side shuttering and supports are required in this case.
- The bottom of the peripheral plinth beam should be on kept 15cm below the existing ground level and necessary plinth masonry should be done above the beam.
CHECKLIST FOR PLINTH BEAM WORK PROCEDURE
- The size (b x d) of the beam.
- Reinforcement of the beam as per the structural drawing.
- Proper anchorage of the bottom and top bars in the columns.
- Length of continuation of bent bars and extra top bars over supports.
 |
| plinth level checking |
- The face of the column on which the beam rests (This confirms the room dimensions and any architectural feature if involved).
- The diameter of the stirrup bar and the spacing of the stirrups.
- The bottom and side cover for reinforcement to be provided.
- Controlling the proportion of the concrete mix.
- Ensuring and checking of line, level, plumb, and supports of the shuttering.
- Plugging of all possible joints of shuttering from where the cement slurry may flow out while vibrating the concrete.
- Confirm the change in concrete grade for beams and columns (if any).
- Ensure the compaction of the concrete.
The procedure and precautions to be taken during casting are almost the same as explained in the below drawing.
- The masonry work either U.C.R. or brick, from footing top to plinth level comes under plinth masonry.
- The thickness and the type of masonry depend on the design of the beams @ plinth tie level.
- Avoid brickwork below ground level to avoid dampness in the plinth.
- No masonry should rest on bare soil, but it should rest either on P.C.C. done on well-compacted strata or on plinth/tie beam.
- While doing masonry in B.C. soil regular U.C.R. either 37.5cm (15″) thick or 45cm (18″) thick is recommended.
- Above ground level, brick blockwork 23cm (9″) or 20cm (8″) in thickness can be done depending upon the size of the beam bottom.
- Working drawings of the ground floor level should be studied properly before doing plinth masonry.
- All beam positions should be marked so that all partitions and external walls will rest on it.
- Internal dimensions of rooms with diagonals should be checked while constructing the walls.
- For 23cm (9″) thick walls, if the height exceeds 1.5m (4′-6″), construction should be done in two layers and each layer should be properly cured.
- Minimum 15 days of curing is required before the filing of murum.
- All R.C.C. surfaces which are visible and will be plastered, later on, should be hacked properly with a minimum of 500 nos. of depression notches per sq.m. of area.
- For details of brick masonry and U.C R. masonry refer to Chapter.
REFILLING OF PLINTH AND FOOTING PITS
- Clear the ground, over which the filling is to be done, of all grass, loose stones, trash of all kinds, etc. If there is water in the area, it has to be pumped or bailed out.
- If the plinth depth doesn’t exceed 45cm (1’6″) above ground level and if the exposed ground is B.C. soil, then remove the B.Č. soil completely to avoid uneven settlement of the flooring.
- Select the refilling material from the excavated stuff and stock it separately for re-use.
- Estimate the quantity of refilling in the plinth and in the pits. Judge the quantity of material available.
- Place the order for any further refilling material, if required.
- Engage laborers for refilling.
- Keep all the tools for refilling and compaction ready.
- Ensure that the water facility is adequate.
How to treat termites before inserting floor PCC in the ground floor
2. FILLING AND COMPACTION
- The sides of concrete and masonry in the foundation trenches or in the column pits should be filled with suitable excavated material. The filling should be done in layers and compacted with steel rammer or wooden logs.
- The approved excavated material which has been stocked shall be cleaned of all rubbish, large-size stones, vegetation, etc.
- The filling should be done in layers. Each layer being 15cm to 20cm (6″ to 8″).

- Each layer is watered and compacted with a heavy rammer of wooden logs or steel.
- If the area of refilling is large, then either electricity-operated or fuel-operated compactions are used, to compact the filling material.
- The process of filling in the plinth, watering, and compaction should be carried out till the required level is reached, so as to form a thoroughly compacted base.
- While compacting, due care is taken to protect the foundation columns, plinth walls, etc., which are already constructed.
- If the depth of filling exceeds 1.0m (3′ 3″), then for economical reasons, building a rabbit (debris) may be allowed as a filling material for further depth using the procedure.
- Black cotton soil should never be used for filling in plinth and footing pits.
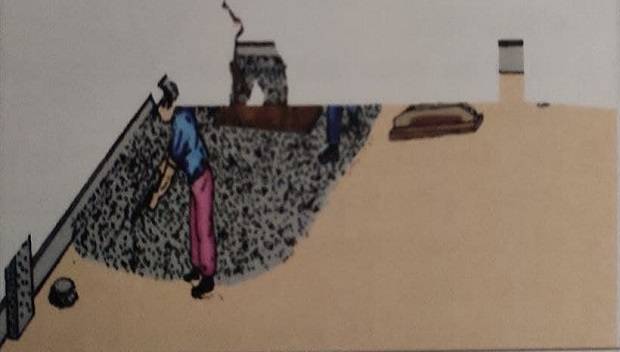
SOLING
Rubble soling of specified thickness shall be laid over consolidated plinth filling.
1. SPECIFICATION OF MATERIAL
- Stones should be in the form of broken rubble, with a fairly regular shape.
- They should be free of any weathered, soft, and decayed portions.
- The rubble should be of sound stones.
- Stones should be of the full height of the soling.
- The stones should contain chips of the largest size possible, to fit in between.
- All sound and suitable rubble obtained from the excavation can be used for soling if approved by the engineer in charge.
2. WORK PROCEDURE FOR SOLING
- The bed prepared should be approved before starting the soling work.
- The soling is laid of 23cm (9″) thickness and closely packed by hand.
- It should be firmly set on the bed with the broadest face down.
- The gaps between adjacent stones shall be wedged in with stones of the proper size and shape. They are driven in with a wooden mallet.
- Ensure that a tightly packed layer is prepared.
- Compaction of soling shall be done thoroughly.
- Ensure, while laying and compacting the soling, that the masonry or any part of the structure is not damaged.
- Rubble soling shall begin after ensuring that the masonry is not damaged.
- Rubble soling shall be started only after the masonry is fully cured.
D.P.C. DAMP PROOF COURSE OVER PLINTH WALLS
D.P.C. stands for the Damp-Proof Course.
A damp proof course is required over the plinth wall because moisture rises up the wall from the adjacent ground, due to capillary action.
Some of the materials used for damp-proofing are
- Asphalt
- Bituminous felts
- Mortar
- Plastic, Metal sheets, etc.
However, in most buildings, D.P.C. is a rich mix of concrete, usually 1: 1-: 3 over the full width of the wall, and the thickness varies from 10cm to15cm (4″ to 6″) with the water-proofing compound. For detailed work, procedure refers.
FLOOR P.C.C.
The top surface of the P.C.C. confirms the plinth level of the building.
After completing the plinth filling with murum and soiling up to the designed level, P.C.C. is to be done.
PREPARATION FOR PLAIN CEMENT CONCRETE P.C.C.
- The compaction of the murum and soiling is confirmed.
- Shuttering planks should be fixed on the side of the beams/masonry work and top-level marking for the plinth should be done.
- Ensure that the columns are already cast, at least 5cm (2″) above the plinth level.
- Plinth P.C.C. should not cover the top of any column surface.
- If the plinth has the same form of an extension to accommodate cupboards, then proper shuttering should be done and sufficient reinforcement should be tied, considering the cantilever action and a dead load of cupboard masonry.
- P.C.C. work should cover the top of the plinth beam work procedure. So, when the plinth beam is in progress, level the P.C.C. margin.
- Concrete thiyyas (level dots) for the top of P.C.C. about 2m to 2.5m (6′ to 8′) c/c should be taken and checked either by dumpy level or level tube.
- Dowels for the staircase should be tied in position.
PROCEDURE OF P.C.C. PLAIN CEMENT CONCRETE
- The thickness of P.C.C. varies from 7.5cm to 15cm (3″ to 6″).
- Normally, the grade of the concrete mix should be M7.5, M10. The approximate volumetric proportion will be 1:4:8, 1:3:6 respectively.
- Depos for concreting may be allowed on the M.S. trays provided on the plinth.
- The procedure for dry mixing of depo should be followed as explained earlier.
- Concrete should be mixed, laid, and spread over the surface to the required thickness.
- Ramming should be done by a wooden log (7cmx 10cm).
- The level between two thiyyas should be checked and confirmed, using nylon thread.
- Finishing off the top surface should be done using randha or tipi.
PLINTH PROTECTION
This is an additional measure to protect the building, especially the plinth from dampness.
1. BASIC NEED TO PROTECT THE PLINTH
- Rain and heat are the main cause of atmospheric action.
- Subsoil water level increases/decreases with the change in season, affecting the moisture content of the soil.
- Due to this, sub-soil shrinks /expands, causing cracks.
- Seepage of rainwater through these cracks brings in salts which have a chemical reaction on lime and the bricks in the foundation, causing them to disintegrate with dampness.
- Make a trench 0.6m to 0.9m wide, peripheral to the building.
- The depth of the trench should be kept 15cm (6″) below the lowest foundation for the basement and at least 15cm below the plinth beam work procedure bottom, for other buildings.
- Refill the trench with selected materials. as in the case of plinth filling.
 |
| checking concrete level dots before PCC |
- Fill in the layers with sufficient watering and compaction.
- Over the compacted filling, the soling of 15cm to 23cm (6″ to 9″) in height is done and compacted again.
- P.C.C. 7.5cm to 10cm (3″ to 4″) in thickness is laid over the soling.
- Over this layer, I.P.S. or any other type of flooring can be done.
- The finished top level should be kept 7.5cm (3″) above the existing ground level.
CHECKLIST OF PLINTH BEAM WORK
- Check the level of masonry work with respect to the plinth level.
- Check that all stub columns are cast (2″) above the plinth or up to the bottom of the plinth beam work procedure as required.
- Check the lap lengths provided for all bars above the plinth for adequate length.
- Check the faces of the columns on which the plinth beam rests.
- Reduction of columns, if any, should be done at the beam level only.
- Check the distance between masonry walls for room dimensions.
- Check the size of the plinth beams and the reinforcement of the same.
- Check the proper anchorage of plinth beam bars in columns.
- Check the shuttering of the plinth beam work procedure for alignment, level, plumb, and supports.
- Check and cast the beams and columns with the proper grade of concrete, ensuring the required covers to the reinforcement.
- Control the design mix of concrete, and carry out the compaction by means of a vibrator.
- Cure the concrete/masonry work. Remove all grass shrubs and loose material from the plinth area.
- Fill the plinth with murum or approved excavated stuff.
- See that filling is done in layers, watered and compacted, no layer being greater than 15cm to 20cm (6″ to 8″)
- Check and keep the proper sunks for W.C. bath and toilets.
- Over compacted filling, hand-packed rubble soling of proper thickness should be done.
 |
| checking of lap lengths |
- Check the quality of the soling material. Compact the soling and fill the gaps with chips.
- Get the side shuttering for P.C.C. and mark the exact level of the P.C.C. top.
- Take intermediate thiyyas and confirm the uniform thickness of P.C.C. throughout.
- Rectify the ups and downs, observed in the above points.
- Do the P.C.C. by hand mix/mixer.
- Compact the P.C.C. with a rammer.
- Level and finish the P.C.C.
- Check the drawing to see if the plinth is given or not.
- If yes, follow the procedure specified and complete the plinth protection.
- Construct the steps of the plinth (in masonry) keeping the margin for the floor finish. Do not confuse the plinth level with F.F.L. (Floor Finish Level)
Good work
Nice information
Nice information helpfull for supervisor
Nicely explained .