Plastering enhances the appearance of the building. The objectives of plastering work can be briefly summed up as below.
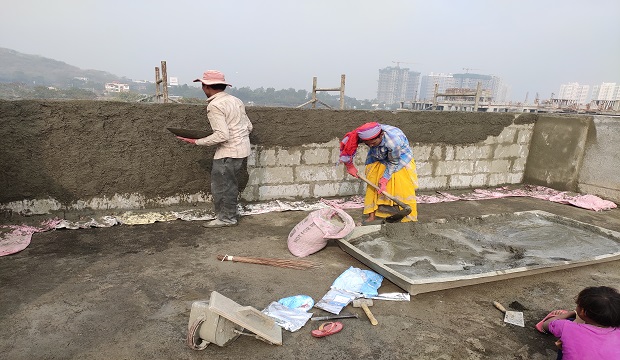
- To protect the surfaces from atmospheric influences.
- To cover the defective workmanship in masonry.
- To cover up unsound & porous material.
- To provide a suitable base for color-wash paint.
In this chapter, we will study the materials required for plastering, and tools required for plastering. types of plaster etc.
MATERIAL REQUIRED FOR INTERNAL AND EXTERNAL PLASTERING WORK PROCEDURE
- Cement
- Sand
- Water
- Admixtures (if any)
- Sanla (Neeru)
TOOLS REQUIRED FOR INTERNAL AND EXTERNAL PLASTERING WORK PROCEDURE
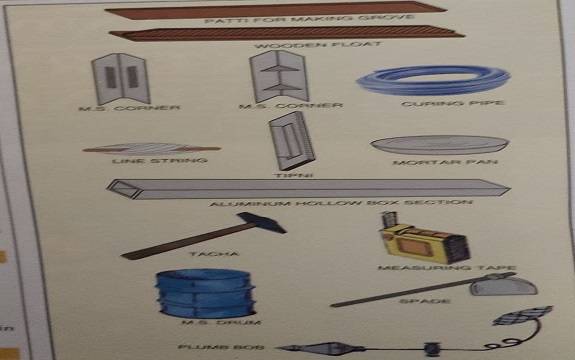
Following is the list of tools, generally required for plastering work.
- Mortar Pans (Ghamelas)
- Spade (Phavadas)
- Chisel (Chinní)
- Hammer
- Trowel (Thapi)
- P.V:C. Water level tube
- Wooden float (Randha)
- Metal float (7pn)
- Batten for making groves (Ghishi Patti)
- Aluminium hollow box section of 1.8m (60″)
- Right angle, small & big
- Measuring Tape
- M.S. Corners
- Nylon string (Line dori)
- Plumb bob (olamba)
- Scaffolding material like bamboos, planks,
- kathya, M.S. chairs, wedges, etc.
- Chicken mesh, plumbing nails, cutter, wire
- nails, G.I. Washers, etc.
- Drilling machine o
- Measuring boxes for measuring sand
- Screens for sieving sand
- Sand sieving machine
- Sand washing machine
- Measuring jar
- Wire brush
- Sponge for sand face plaster
- Metal tray for mixing mortar
- G.I. buckets with capacity marking
- Screens for sieving sand
For internal plaster 10 holes/cm2 (64 holes/sq.inch)
For external plaster (1st coat) : 10 holes/cm? ( 64 holes/sq.inch)
For external plaster (2nd coat) : 13 holes/ cm? ( 81 holes/sq.inch)
TYPES OF PLASTER
The different types of plaster can be classified on the basis of ingredients used and the proportion of binding materials.
- Cement plaster
- Lime Plaster
- Mud plaster
Classification based on ingredients used.
- 1:2
- 1:3
- 1:4
- 1:5
- 1:6
Classification is based on the proportion of binding material (Cement lime Sand) The above being Volumetric Proportion.
- Smooth cast finish
- Scrapped finish
- Textured finish
- Pebble finish
- Roughcast finish
- Machine applied finish
- Sanla (Neeru) finish plaster for, internal surfaces in cement mortar.
- Sand face plaster for external surfaces in cement mortar.
- A rough guideline for cement and sand mix proportions is as follows,
- For internal ceilings = 1:4
- For internal walls = 1:6
- For external walls 1st coat = 1:5
- For external walls 2nd coat = 1:5
PRECAUTIONS TAKEN FOR SCAFFOLDING OF EXTERNAL PLASTER
- Use good quality material.
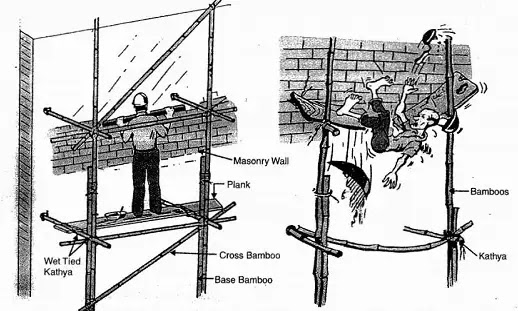
- Bamboos, kathya & wooden planks should not be old & weak, so as to avoid probable accidents.
- Erect the base bamboos on hard & firm ground, with a minimum anchorage of 45cm (1’6″) in-ground.
- Kathya should be wet while tying, for better tightness.
- See that the scaffolding is in plumb & not inclined, Ensure that every junction of the scaffolding is well tied.
- Holes in masonry for bamboo support should be made at the skirting level, as far as possible, to avoid leakage/seepage in the wall from the holes.
- Scaffolding erection should be carried out with the help of skilled workmen so that the structure possesses the required stability.
- Ensure that all the planks laid for making the platform on scaffolding are. strong enough to take the mason’s load. In case two masons are required to work at one place, then put a double plank instead of a single one.
- All planks resting on the scaffolding must be tied with wet kathya.
- Locate the holes/openings for taking mortar ghamelas from room to outside at the skirting level.
- Ensure that the scaffolding is used within a week after its erection.
- Scaffolding should be removed step by step, from top to bottom, as the work finishes.
- Keep 90cm (3’0″) distance between the scaffolding and the wall to be plastered, for sufficient working space for the mason.
- Ensure that all the supporting bamboo are passed through the wall & tied internally, with other vertical & horizontal bamboos. Half anchorage in the wall for support should not be allowed.
- Proper wedges in the masonry hole, for the tightness of bamboo, should be provided.
- Kathya should be removed systematically during de-scaffolding, for reuse.
- While removing the scaffolding, ensure that no one is working under that particular area, so as to avoid accidents.
EXTERNAL PLASTER WORK PROCEDURE
1. PREPARATION OF EXTERNAL PLASTER
- Ensure that masonry work is complete in all respects.
- Make scaffolding in advance, where the plaster is to be done.
- Fill the external side gaps in masonry & joints of the beam and wall, which was not possible earlier without scaffolding, This should be done with rich cement mortar 1:3 & finish the surface by roughening with wires.
- The process should begin a minimum of two days prior to plastering for gaining enough strength.
- Take the plumb or line from top to bottom at all the edges. Plasterwork confirming to these lines will give the finished surface.
- Keep the thickness of the plaster to a minimum. If the beam or column is bulged out, then chiseling is to be done with a sharp chisel & hammer, only after the R.C.C. designer’s permission.
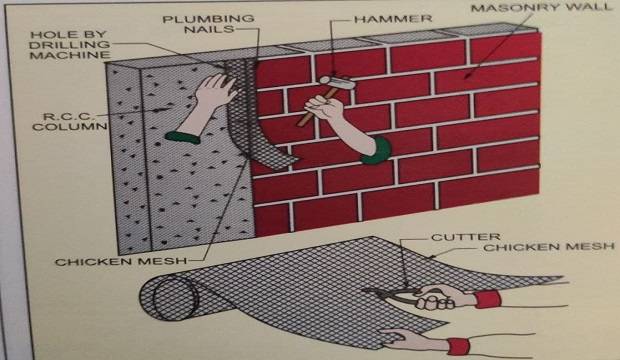
- Make holes on the wall, column, and beam with a drilling machine, for fixing chicken mesh to all joints of masonry & R.C.C. work.
- Cut the chicken mesh in a minimum 20cm (8″) to 23cm (9″) width by the cutter.
- Choose the chicken mesh of 12mm holes & 24 gauge for external plaster.
- Fix the chicken mesh on the joint of R.C.C. & masonry wall, by plumbing nails on R.C.C. members & wire nails on the masonry members.
- Half the width of the chicken mesh will be on the masonry wall & half will be on the R.C.C. members.
- The chicken mesh should be tight enough in both directions, vertical & horizontal.
- The spacing of nails should not be less than 9″ to avoid buckling & loosening of chicken mesh. which may then come out of the plaster.
- Remove all wooden pieces, papers, Kathy, etc., and other unwanted materials from the R.C.C. & masonry surfaces.
- Wet the surfaces a day before plastering.
- Check all chhajjas for the smooth opening of the outer windows.
- Check all the windows, door frames, etc. for plumb, line, and level. In case of any defects, rectification is to be done before plastering.
- Check the top levels of the parapet walls before plastering.
- Check all the elevational features as per the Architectural drawings.
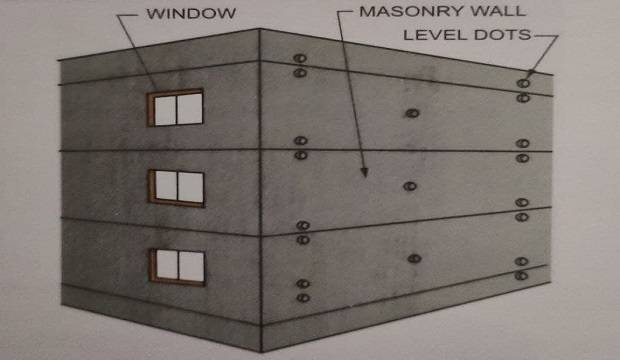
- Take level dots (thiyya) before starting the external plaster.
- Clean the R.C.C. surface with a wire brush, if affected by green algae.
- Put line Dori from the top slab to the bottom level, for all corners of the walls (Dhar), corners of windows, line of elevational features, line of R.C.C. grill, and all straight lines in that portion.
- Wash the sand before use, if the silt content is more than 7%.
- Before starting external plastering, ensure that all the points are complete as per the preparations of external plaster.
- Dump sand, with measuring boxes, wherever required after considering the bulkage of sand, if any. For quality results, this should be done on a platform of G.I. sheets.
- Take sand proportion 1:5 for 1st coat.
- Mix the depo (heap) of sand & cement, pour sufficient water to get the required consistency of mortar.
- Do not mix more than 3 bags depo at a time, (according to the number of masons), so as to avoid the initial set of mortar before use.
- The mixed mortar should be used within half an hour.
- Do not pour excess water, as it causes the cement slurry to flow.
- Keep the area, where the mortar is to be mixed, clean.
- After all the preparatory measures, start plastering.
- Apply plaster to the same face level & finish the same with the help of float (randha) and trowel (thapi).
- Ensure that no uneven surface is observed. Check the surface from different sight angles for proper judgment.
- Check the surfaces with line Dori on respective thiyyas. (dots.).
- Roughen the surfaces with wires, for better bonding to the second coat.
- If a second coat is proposed simultaneously, then there is no need to roughen the surface. Apply the second coat directly.
- After a second coat, remove the scaffolding step by step & fill the holes with mortar and wet brick pieces. This is a dangerous portion & can create leakages. These holes are to be treated with almost care.
- Simultaneously, clean all the surfaces of the adjacent wall, windows, RC.C. grills, etc.
- Sills of windows to be finished with I.P.S.ghotai (smooth finish) in sloping from, from outside.
- Ensure that all chhaijas projections should be finished with drip mould (pani patt at the bottom of the chhajja & the top should be finished with I.P.S. smooth finish, (Ghotai) provided the projected rounding in plaster (Kant) and line Dori checks on I.P.S. with required outward slope.
- Ensure concrete coping on the parapet wall. The top of the parapet wall to be finished with I.P.S. Ghotai (smooth finish) & line Dori checks The top should be sloping inside for a minimum of 12mm slope. The top plaster of the parapet should be done in one stage.
- If a second coat of plaster is proposed, then the second coat will be of 6 to 8mm thickness & shall be applied on the third day or within five days from the first coat.
- The second coat should be finished with a sponge for a uniform texture and finish. A minimum of two days of curing is required for the first coat.
- The gap between the first coat and the second coat should not exceed 5 days.
- Avoid using dry cement to minimize the cement content as well as cracks on the surface,
- Chiseling the bulged portion of R.C.C. beam çolumns is subject to permission from the R.C.C. designer. It is preferred to applying thick plaster to the entire surface.
 |
| adding water dry mix |
- Cut the plaster of the parapet wall from inside at 40cm (16″) from the slab level for the provision of WATERPROOFING WORK PROCEDURE .
- Curing of plaster shall be carried out for a minimum of 15 days.
- Curing should be done from top floor for dead walls and from the individual floor to other walls, where openings & chhajjas are provided.
- Curing for the bottom of chhajjas should be done from the bottom side.
- Write dates on the finished plaster surface to find out the total curing period.
- Note that surface plaster in the staircase, balconies, and parking will be of a fine texture.
- Band (Patta) from all four sides of M.S. windows in W.C. & bath should be provided in plaster; 75mm (3″) wide & 25mm (1″) projecting outside this will allow more space for making Pani Patti top jam of WINDOWS PROCEDURE FIXING.
- Vertical expansion joints should be plastered with the vertical band (Patta) 25mm (1″) wide &12mm (“) thick from either side of sion joints.
- Ensure that no cement paste is filled in the expansion joint, over the pre mould bitumen sheet. Expansion joints should be cleaned thoroughly after the plasterwork. This groove will be filled with rubberized expansion material later on.
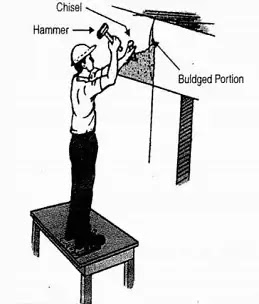 |
| chiseling of buldge portion |
- Any projected band (Patta) of the parapet wall should be cut in slope, This will help to keep the rainwater away from the wall.
- Avoid making holes in the dead wall for taking ghamela. If required, do it at the skirting level and the finishing of this portion should be done with brick blockwork and concrete around brick/block. Almost care should be taken for finishing the same using chicken mesh on joints.
- The sand-faced plaster shall be carried as per specifications and as shown in the drawing.
- The sand-face plaster shall be in two coats simultaneously or a second coat after 3 days.
- The first coat of thickness 13 to 15mm in C.M. 1:4 as the backing coat is applied.
- The first coat shall be roughened and shall be kept damp for at least two days.
- The first coat shall be sufficiently cured for two to three days, to receive the second coat.
- The second coat of thickness 6 to 8mm in C.M. 1:5 should be applied as a finishing coat.
- The second coat shall be finished, smooth to texture, even surface, uniform in line, and plumb.
- The chicken mesh of 12mm X 12mm, (1/2″ ) of 24 gauge, shall be provided with a width of at least 23cm (9″) on either side of the joints, for the junction between two different materials. (e.g. concrete and brick masonry)
- Drip mould (pani patti) of width 35mm and 5mm thickness shall be provided to all chhajjas, projected slabs, etc.
- The top of all chhajjas shall be finished with plaster, in C.M. 1:3 using the water-proofing compound. The height of such plaster shall be at least 150mm above the chhajjas & it should be suitably cut inside in line with the wall plaster, as shown in.
- Window sills shall be given I.P.S. smooth finish and outward slope to drain off rainwater smoothly.
- Window sill band (patta), if any, shall be of 40mm in width and projected for at least 5mm thickness beyond the wall plaster and shall be finished using extra cement.
- Curing of plaster shall be carried out at least for 15 days and a minimum of 4 times a day.
CHECKLIST FOR EXTERNAL PLASTER
- Use measuring boxes according to the mix proportion.
- The smoothness of the concrete surface should be by hacking with tacha.
- Thoroughly water the surface to be plastered, one day in advance.
- Check the verticality & stability of the scaffolding provided.
- Practice the dots (thiyya) or screed before plastering, to ensure a minimum specified thickness.
- Fill the cement-sand mortar between the junction of the bottom of the beam to the last layer of the masonry, well in advance, before plastering.
- Fix the chicken mesh of a minimum 23cm (9″) in width on either side of the junction, of different surfaces.
- Keep 3 to 4 days gap between the 1st coat and And coat, for double cont plaster.
- Finish scaffolding holes properly and immediately.
- The verticality of the window opening jamb as well as the horizontality of Its bottom sills and top to be checked during plastering work.
- For the parapet wall, leave the plaster for 40cm (16″) Le. two blocks of 20cm (8) at the bottom from the terrace side for waterproofing purposes. Clean the terrace after plastering work.
- Cure the plaster for 15 days minimum.
- The plaster should be checked for its thickness, line, level, and plumb.
- An experienced engineer can easily measure the quality and required checks by visual inspection alone.
INTERNAL PLASTER WORK PROCEDURE
- Ensure that all the masonry work 1st completed in all respects.
- All windows, and door frames to be checked for line, level, plumb, position, sizes. If not correct, then rectify the same.
- See that holdfast of windows and door frames are concreted properly.
- The nailing of the column strip (chharpatt) to the column should be proper with full depth of nail. The nail should not be bent. Use the drill machine only for holes.
- Ensure that proper margin from all four sides of the window is provided, (minimum 20mm (1″) from all four sides).
- Ensure that all changes in masonry, as per extra amenities, are done & checked.
- The chicken mesh should be fixed to all vertical and horizontal joints of R.C.C. and the masonry wall.
- The chicken mesh should be equally fixed in width on the masonry and R.C.C. portion.
- The chicken mesh should not be loose, or else it will come out of the plaster.
- Holes and joints in the masonry wall and R.C.C. beam should be filled with rich mortar before fixing the chicken mesh.
- Chip off all unwanted portions in R.C.C. and masonry, before starting the plasterwork,
- See that sufficient curing to all masonry, lintel, lofts, and repairing work is done.
- Check the levels and thickness of the loft.
- Check the top of the loft, at the junction of the wall, where normally unwanted concrete is found, as it can cause the improper level of the loft. Remove this concrete before plastering.
- In case of concealed wiring, check whether all-electric, TV & telephone conducting work is finished as per the requirement, i.e., board level, first-floor level, distance of board from the wall, provision for crossing electric lines wall to wall, etc.
- Finishing of concealed conduits to be done after chicken mesh fixing, if more than 2 pipes are running simultaneously.
- See that the fan hook is exposed and straight in line & level for all rooms.
- Remove unwanted concrete, and mortar from the point floor to mix plaster mortar, on a clean surface.
- All the walls & ceiling surfaces should be saturated with water a day before plastering.
- Mark the level of sanla finishing in W.C./bath on the door frame with chalk or red pencil.
- Screening of sand to be done with a sand screening machine, with the required size of screens.
- Check the silt content of the sand & if it is found to exceed 7%, then wash the sand with a sand washing machine or manually, before the screening.
- Take thiyyas level dots of plaster in all rooms at top & bottom levels of all walls & ensure that the maximum thickness should not exceed 20mm (3/4″).
- Ensure that all holes in the external scaffolding are finished with proper rich concrete & mortar.
- Check whether tacha (hacking) to ceiling, beams, columns & lintel loft is sufficient or not; it should not be less than 50 Nos, notches per s.ft. (500 Nos./m2)
- Ensure that the door frame is projecting by 12mm (1/2″) outside the wall & R.C.C. lintel above so that after plastering, the wall surface will be flush to the door frame.
2. PROCEDURE OF INTERNAL PLASTERING WORK
- Arrange M.S. chairs, wooden planks, kathya for scaffolding, and check it for stability & suitability for easy movements, proper heights, etc.
- Dump the required sand, measure with measuring boxes as per the proportions of the mix
- and considering the bulkage of sand, if any.
- Use C.M. 1:4 proportion for the ceiling.
- Use C.M. 1:6 proportion for the wall.
- Mix the ingredients in proportion & use the required quantity of water, Do not add extra water, and do not allow the cement slurry to wash out.
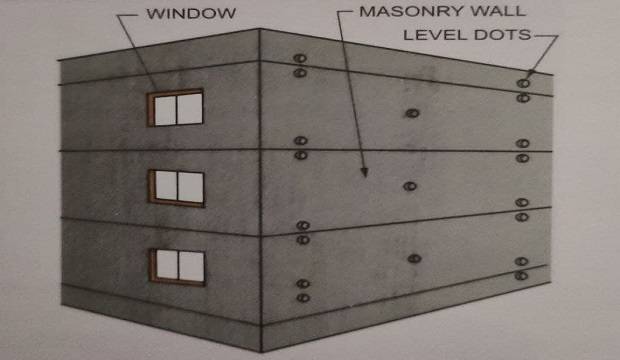
- Mix only 2-3 bags depos at a time & use mixed depots within half an hour.
- Cut the cement bags with a hack-saw blade & not with a phavada.
- Start plastering of the ceiling first & then the walls.
- Apply sanla to all the walls after two hours, except where tiles in dado are to be fixed.
How Plaster Thiyya Setting ( Level Dots) are done or How to plaster a wall?
- Leave and cut the plaster correctly, 23cm (9″) from floor level for skirting fixing.
- Neatly finish all the corners of windows, doors, columns, etc. with pure cement.
- Clean all windows, fan hooks, door frames, etc. after plastering.
- Check the dado as per the extra amenities and where sanla application is not required and roughen these surfaces with wires, for better bonding to tiles.
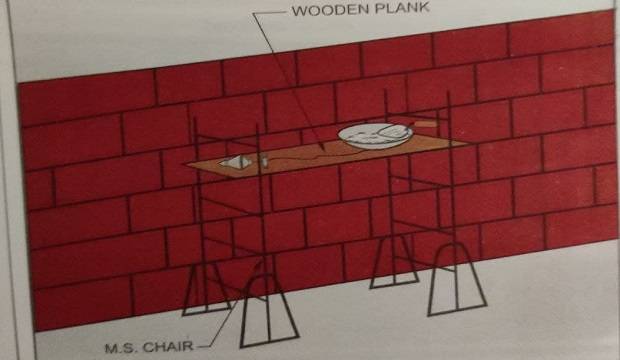
- Clean the entire room area, especially W.C./ bath area.
- Do not leave any unfinished patches on the ceiling/walls.
- Check all the corners of window jams, door frames, etc. & finish them properly.
- The finish (ghotai) of sanla should be very smooth.
- Do not allow the extra thickness of sanla, as it leads to surface cracking.
- See that no chicken mesh wires are seen outside the plaster. If observed, cut them and finish immediately.
- Do not allow bamboo scaffolding for inside plaster.
- Ensure that the maximum plaster thickness should do not exceed 20mm. (3/4″)
- On the second day, smooth finishing should be done with the mason’s trowel, before starting the day’s work.
- See that I.P.S. smooth finish (ghotai) is done on the top of the loft with line dori marking.
- The loft top should be finished in level & not in a slope.
CHECKLIST FOR INTERNAL PLASTER
- Service lines like electrical work and plumbing
- lines-chasing and filling of voids (ghabadi).
- Sufficient hacking (tacha) to all R.C.C. work.
- Leakage checking (toilets/W.C. passage). Heights and locations of electrical points switchboards, TV, and telephone points.
- The verticality of all door & window frames.
- Hold fast fixing of door frames in concrete.
- Cleaning of all R.C.C. and masonry surfaces.
- ‘Khadi Maal’ at beam bottom, column & masonry joints.
- Chicken mesh fixing.
- Watering of surface a day before plastering.
- Thiyya/level dots.
- Depo measured by Farma.
- Silt content of sand (permissible limit).
- Arrangement of M.S. chair (ghodi), planks.
- Extra amenities if any.
- Covering of electrical boxes by dummy plates.
- Soaking of sanla (if not instant).
AFTER PLASTERING
- Fan hook at its position.
- Line. level, right angles to the plastered area.
- Sanla application after 2 hours.
- Second-day smooth trowelling.
- Sills; column beam edges in plumb.
- Cleaning of the plastered surface.
- Curing for a minimum of 10 days.
- 9″ cutting of plaster in level for skirting fixing.
- No sanla application for glazed/ceramic dado.
- Edges to be made in neat cement.
- Cleaning of windows/door frame.
- Floor cleaning to expose slab top.
- Finishing ghabadi work immediately, if any.
- Provision of window sill fixing.
- I.P.S. and checks marking on the loft.
- The thickness of the loft should be the same, all over the flat.
- Check the diagonals, right angles of all window jams.
- The width of jams should be the same, from all four sides.
- Do not carry out the plastering of the bottom 30cm (1’0″) portion in W.C. & bath from slab level, as water-proofing needs to be done in that portion later on.
- As no skirting is to be provided below & to the sides of the kitchen otta & balcony, plaster all the four walls up to 25mm (3″) from the bottom slab level.
PRECAUTIONARY MEASURES TO AVOID CRACKS IN PLASTERING
The cracking of plaster is a phenomenon observed in most buildings. If enough precautions are taken, the plaster cracks can be minimized. The following are some precautions to minimize the plaster cracks. Please note that precautionary measures are to be taken from the masonry stage of the work.
At the time of masonry, apply a thin layer of rough cement-sand plaster (Chhat), at the junction of the masonry & column. At this junction, cracks are likely to develop due to the different coefficients of expansion of the two materials. The application of a thin cement-sand layer reduces the chances of cracks developing.
Do not erect more than 1.0m of masonry work, at a time. For 10cm. and 15cm thick masonry walls, provide R.C.C. band at every 1.0m height. This will reduce the settlement of masonry & cracking at the top level, at the junction of beam & masonry.
Treat masonry & floor beam junction with the help of Khadi Maal’, (packing of 20mm (3/4″) metal tightly with rich cement mortar on the junction of R.C.C. beam, column, and masonry), and chicken mesh because here, the formation of a crack is definite as the coefficient of expansion of two materials is different. Khadi-Maal & chicken mesh reduces the chances of cracks developing.
Do not plaster the concrete block masonry for up to 60 days, as the shrinkage of the block masonry wall normally continues up to 60 days. If a full shrinkage period is given to the masonry & then plaster is carried out, chances of cracks due to shrinkage .of masonry get minimized.
Properly fill and cure all the holes, gaps, chiselled portions of masonry, conduits, etc. with cement sand mortar 1:5.
For constant cement proportion & controlled mortar quality use depos measured with farmas (measuring boxes) only.
Do not allow the use of stale mortar, as its initial setting time is over, leading to the cracking of fresh plaster.
Do not use excessive water for mixing mortar as cement slurry may flow out of the mortar, reducing strength and leading to cracks.
Do not allow plastering over fully dry masonry surfaces, as it absorbs water from the plaster mortar, leading to the drying of mortar and cracking of fresh plaster.
Do not allow the excessive thickness of plaster in a single coat, as the use of dry cement becomes unavoidable in such circumstances leading to cracking of the plaster.
For ceiling plasters & plaster to any R.C.C. Surface, check whether sufficient hacking is (done or not. insufficient bonding due to less hacking may lead to peeling/falling or crack of the plaster.
Do not allow plastering on oily surfaces, as poor bonding to plaster may cause cracks or peeling of the plaster.
Do not allow excessive water to flow through the surface to be plastered, as this may lead to the collapse of the freshly plastered portion because of the constant presence of water. Always stop all the leakages of water through the surface to be plastered, a day in advance.
Always plaster the ceiling first in a cement-sand mortar (114) & then plaster the walls. This reduces the possibility of using stale mortar when the ceiling is plastered first.
In hot seasons, while plastering the ceilings of the terrace floor, keep the terrace slab cool with the help of wet gunny bags. The chances of falling ceiling plaster and crack development reduce considerably.
Sieve the sand, as explained in the masonry plastering chapter, too coarse or too fine sand leads to cracks in plaster.
The quality of the sanla should be checked, before applying it to the plastered surface. Bad quality sanla causes surface cracking & peeling off of the top layer, leading to ugly patches.
Instant sanla is easily available in the market, Prepare a paste of the sanla by adding water, two hours before it’s an application on a freshly plastered surface, Instant sanla is very convenient and easy to use.
Provide lintels on windows, exceeding sufficient distance at both sides, to avoid diagonal cracks below lintels at window corners, due to stress concentration.
The extra bearing of lintels allows proper load distribution on the supporting walls, reducing the chances of development of cracks.
PLASTERING WORK CALCULATION
plastering work calculations are Area = length x width and unite is square meter
PLASTERING WORK THICKNESS
- Internal wall plastering thickness is 12mm, ratio 1:6
- External plastering work thickness is 15mm to 18mm, ratio 1:4
- Celling wall plastering thickness is 3-4mm, ratio 1:6
PLASTERING WORK RATE ANALYSIS
- Plastering work rate calculation per square foot is 90 rupees measure slab area only, lump sum rate.
- Plastering work internal rate is per square foot 30 rupees measure brickwork phase
- Plastering work external rates is per square foot 60 rupees measure brickwork phase
Your website provides proper knowledge About the work