In this article, we discuss various practical norms regarding this. Since the site engineer is directly involved with the receipts and use of materials, more weightage is given to the actual physicaltests to be carried out at the site.

FREQUENCY OF BUILDING MATERIAL QUALITY TESTING AND REPORTING PROCEDURE
- All materials received at the at should be tested for quality, The frequency of these tests (field laboratory) may vary as per the site requirements.
- The table shows the frequency of building material quality testing and reporting procedure for practical convenience.
- which may vary or stick to the standard norms. It is advisable to conduct laboratory tests for an initial lot of every material or if there is a change of source/brand.
REPORTING PROCEDURE FOR BUILDING QUALITY MATERIAL
- Detailed field tests should be carried out by the site engineer after receiving the building material quality testing and reporting procedure.
- The reports should be submitted to the Project Engineer in the prescribed format. The Project engineer should submit this report, along with his. remarks and signature, to the Head Office through the Chief Engineer.
- In case of any rejections of material, a copy of the quality report should be sent to the purchasing department for further action.
- If the material is accepted, the copy of the quality report Pinous goes to the accounts department for clearance of payment to the supplier.
- The quality report should reach the head office along with the challans immediately after receipt of building material quality testing and reporting procedure.
Building Construction Materials Testing Quality Control Pdf Download Link Below
Frequency of material testing
| SR NO | MATERIALS | FIELD TEST | LABORATORY TEST (AFTER EVERYDAY/*) |
| 1 | CEMENT | EACH LOT | 10,000 BAGS/* |
| 2 | WHITE CEMENT | EACH LOT | * |
| 3 | SANLA | EACH LOT | 500 BAGS/* |
| 4 | LIME | EACH LOT | 500 BAGS/* |
| 5 | STELL | EACH LOT | 40 TONNES/* |
| 6 | METAL (12MM, 20MM, 25MM, ETC) |
EACH TRUCK LOT | 100th TRIP/* |
| 7 | SAND | EACH TRUCK LOT | 200th TRIP/* |
| 8 | DUST / GRIT | EACH TRUCK LOT | |
| 9 | BRICK 4″, 6″ | EACH TRUCK LOT | 50,000 NOS/* |
| 10 | CONE ETE BLOCK 4″, 6″ |
EACH TRUCK LOT | 15,000 BLOCL/* |
| 11 | ROUBBLE | EACH TRUCK LOT | * |
| 12 | BRICK BATS | EACH TRUCK LOT | * |
| 13 | MIRUM | EACH TRUCK LOT | * |
| 14 | WOOD | EACH TRUCK LOT | 10 CUM (350CFT)/* |
| 15 | DOOR FRAME | EACH LOT | 200 NO/* |
| 16 | DOOR SHUTTER | EACH LOT | 200 NO/* |
| 17 | DOOR FITTING | EACH LOT | * |
| 18 | HARDWARE ITEM | EACH LOT | * |
| 19 | M.S.WINDOWS | EACH LOT | * |
| 20 | M.S GRILL/ RAILING | EACH LOT | * |
| 21 | ROLLING SHUTTER | EACH LOT | * |
| 22 | GLASS | EACH LOT | * |
| 23 | MOSAIC TILES | EACH TRUCK LOT | 200,000 NOS/* |
| 24 | STONE (SHABAD,KOTA, CUDDAPPA/TANDOOR) |
EACH LOT | * |
| 25 | CERAMIC/GLAZED TILES | EACH LOT | * |
| 26 | MARBLE GRANITE | EACH LOT | * |
| 27 | G.I PIPES ( 15MM, 200MM) | EACH LOT | * |
| 28 | PVC PIPE & FITTIING | EACH LOT | * |
| 29 | C.I PIPES ( 15MM, 200MM) | EACH LOT | * |
| 30 | A.C PIPE & FITTING | EACH LOT | * |
| 31 | S.W.C / R.C.C PIPES | EACH LOT | * |
| 32 | SANITARYWARE | EACH LOT | * |
| 33 | SANITARY FITTING | EACH LOT | * |
| 34 | ELECTRICAL ITEM | EACH LOT | * |
| 35 | MACHINERIES | EACH MACHINE | * |
| 36 | PAINTS | EACH LOT/BRAND | * |
 |
2. QUALITY REPORT
- Material description.
- Quality of material.
- Supplier’s name.
- Challan No. with a date.
- Details of trademark of material (if any). Name of the engineer who has checked the quality of the building material quality testing and reporting procedure.
- Quality tests.
 |
| Quality tests report for steel |
 |
| Quality tests report for cement |
PROCEDURE OF REPORTING FOR REJECTION OF INFERIOR QUALITY MATERIAL
- The inferior quality of building materials like sand, metal, dust, grit, etc. can be observed by visual inspection.
- In this case, the storekeeper should inform the engineer for further confirmation.
- The material should not be accepted and the purchasing department should be informed immediately.
- If a full truckload of the material is received, the quantity can be observed by visual inspection.
- If the quantity is found to be less, the fact should be brought to the driver’s notice.
- The storekeeper will take actual depth by inserting a steel rod in the material or by taking line Dori at the top Patti level.
- If the driver confirms the difference between the quantity requisitioned and the quantity received, only then permission should be given for unloading.
- The actual size of the truck and actual measurements received should be noted on the challan.
- The driver should sign this challan as acceptance.
- For materials that are accepted in numbers, a shortage in numbers should be mentioned on both the copies of challan.
WHEN INFERIOR QUALITY MATERIAL IS MIXED WITH GOOD QUALITY
- At times, mixing of inferior quality material with the specified quality is observed after, unloading some quantity of the accepted building material quality testing and reporting procedure.
- The storekeeper, in this instance, should decide the quantity of bad material in consultation with the Project Engineer, and record it accordingly.
- Reduction in quantity should be notified to the driver and his signature should be taken on the challan.
- The storekeeper should not 20% bill should be deducted or 20% quantity was bad etc.
Test on Cement at construction site | Field Test on cement
MATERIAL FOUND DEFECTIVE WHILE WRITING QUALITY REPORT
- All discrepancies of material regarding the brand, size, quality, etc. should be clearly mentioned in the quality report.
- The Project Engineer should clearly mention the non-acceptance of quality. In case of clarification from the supplier, ask for his visit.
- This quality report should go to the purchasing department with the Chief Engineer’s remarks.
- The purchase department will ask the supplier to visit the site.
- The supplier has to make arrangements for taking back the material and necessary replacement.
FOR MATERIAL FOUND DEFECTIVE DURING AFTER WORK IS OVER, EVEN THOUGH GOOD QUALITY REPORT WAS SUBMITTED
The Project in-charge after a detailed inspection should write a clarification report with the exact nature of the defect, the reason for not reporting it earlier, the inadequacy of the material for the required work, and alternate solutions, if any.
Suppliers, at times, unload the material at the site without observing site rules and insist for challan eg. after the store is closed, on holidays, dump the material at unwanted locations for own convenience, do not accept the shortage in quantity, etc.
In any such case, the storekeeper should not sign the delivery challan.
If the supplier unloads the material without permission then it should be reported to the H.O. on the “Clarification Report”.
Information on such incidents can also be given to the purchase department telephonically.
QUALITY TESTING OF BUILDING CONSTRUCTION MATERIALS AT SITE
1. SOIL
During excavation, it is necessary to check soil samples and finalize the bearing strength. Stratas at different levels are
RED SOIL
Red in color, absorbent in nature, turn to clay when it is dry and forms a hard lump that is not easily breakable. It cannot be powdered by applying finger pressure.
Termed as good soil – approximately safe loading is 30 tonne/sqm (30 T/sqm).
BLACK COTTON SOIL
Greyish black in color, heavy clay content. Swells when wet, shrinks when dry, develops heavy cracks, termed as poor soil. Approximate safe loading is 5 to 10 tonne/sqm.
SHADU
It is yellowish/whitish brown. A soil intermediate between clay and sand. Wet shadu contains moisture but when it is dry it may possess appreciable cohesion. However, its lumps are easily broken with finger pressure.
Termed as moderate soil. Approximate safe loading may be considered as 10 to 15 T/sqm.
BEARING CAPACITY OF SOIL
- The bearing capacity of soil can be tested at the site as per standard test procedure.
- A pit is excavated up to the strata that need to be tested.
- The bottom of the pit is leveled, the bearing plate is kept and load is applied.
- The load applied is normally four times the proposed design load. The settlement is recorded every 24 hours until no settlement occurs in 24 hours.
- The settlement under the test load should not be more than 20 mm.
- Loading can be done by using cement bags or sandbags.

2. MURUM
It is red-brown in color, of irregular shape and size, and does not contain moisture when wet. Dry compacted deposits are treated as strong strata.
Approximate safe loading is 20 to 46 T/sqm.
3. ROCK
It is the lowermost layer of strata with immense strength.
Safe loading for soft rock varies from 20T/sqm to 90T/sqm and above and that for other rocks from 100T/sqm.
4. CEMENT
FRESHNESS TEST
- Choose any bag at random.
- Check the printed manufacturing date.
- It is given as W-for week, M-for month, and Y-for year.
- It should not be more than 30 days old.
SMOOTHNESS TEST
Open the cement bag from one corner. Take a pinch of dry cement and rub between the fingers. It should feel silky.
FLOATING TEST
- Take a clean measuring glass jar.
- Fill the jar with clear water.
- Take some dry cement and add it slowly to the water.
- Good cement floats for a while and then sinks slowly to the bottom.
- Any lightweight impurities may remain floating even after the cement sinks. Heavier impurities sink immediately.
- The quality of cement can be affirmed by the floating test.
LUMP TEST
- Take any cement bag at random and test It for the presence of lumps.
- Fresh cement should be in powder form only.
- Any cement bag with lumps should be rejected.
CUBE TESTING ON SITE
- Prepare 5cm x 5cm x 5cm cube of cement paste.
- Plastic or tin boxes can be used for this purpose.
- Place the cube in water Immediately.
- After 24 hours the edges of the cubes should remain sharp and should gain some strength.
5. STEEL
HARDNESS TEST
- Take I’m length from each diameter of bars belonging to different lots. Bend the bar by applying pressure at both ends with your hands.
- Observe the bent portion, It should be smooth.
- If the steel is not of good quality, it may break or develop cracks on the bent surface. Such steel should be rejected.
WEIGHT CHECKING
- Take exactly the 1-meter length of each diameter of the bars on a random basis.
- Weigh each sample on a weighing scale.
- Compare the weights with the theoretical weights given.
- The difference in weight should not be more than 5%.
6. SAND
TEST FOR BULKING OF SAND
- Take 250 ml. glass cylinder.
- Fill up with damp sand up to 200 ml. mark.
- Slowly pour some water. The sand settles to its actual volume which is less than 200 ml. Mark this level. Let us assume that it is Dml.
- Then Bulkage is calculated by using the formula
- % bulkage = 200 – D/D X 100
- This bulking of sand should be known for proper correction to be applied when calculating dry sand requirements.
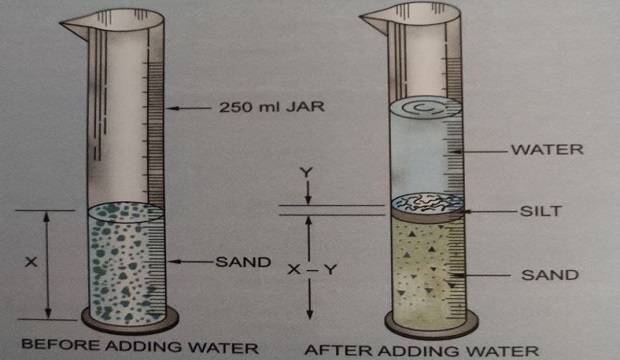
SILT CONTENT OF SAND
- Take a clean. 200 ml. measuring cylinder.
- Fill with sand up to a certain mark ( say the reading is X). Add water above it up to 200 ml. and shake well.
- Allow a period of 2 hours for settlement.
- Clean sand will settle at the bottom with silt and clay impurities on top of the sand layer.
- Now observe the top-level reading for sand. Assume that it is Y. Then the silt contains.
- % silt content =x-y/x 100
- Total silt content should not be more than 7% for good quality sand.
- Observe the sand while unloading the truck.
- Visual inspection shows colored particles other than sand such as shells, gravels, lime impurities, etc.
- This should not be more than 1% of the total sand received.
7. METAL
WATER ABSORPTION TEST
- After unloading metal, collect small quantities of metal from different parts of the heap.
- Mix these quantities and take exactly 2 Kg of metal in a container.
- Add clean water to totally submerge the metal.
- Let it be submerged for 24 hours.
- Weigh the wet metal. The weight will be more than 2 Kg. Note down the difference in weight. Calculate the absorption by the following formula.
- % Absoption = Difference in weight/Original weight X 100
- For metal to be used in concrete work, water absorption should not be more than 5%.
8. BRICKS BLOCKS
WATER ABSORPTION TEST
Select 3 Nos. of bricks/ blocks of proper size and shape at random.
Weigh each sample and note it down as
Take the average as = W1+W2+ W3/3
Submerge the samples in water for 24. hours. Weigh the wet samples again as W1, W2, W3. Take the average
W1+W2+ W3/3.
Calculate the % absorption by the formula.
% Absoption = Difference in weight / Original weight x100
For a good quality brick, this value should not exceed 20%.
Water absorption of concrete blocks should not exceed 10%.

STRENGTH TEST
- Choose a brick/block at random from the stacking. Hold t straight in one hand up to a height of 60 cm for brick and 90 cm for the block.
- Drop it on a flat surface. A good brick should not break.
- If any breakage is noticed, the lot should be immediately rejected.
- In the case of the block, it should not break at all. Even corners and edges should remain intact.
- This testing of blocks should be done after the curing period is over.
9. SANLA
Normally sanla is not put to immediate use atter receipt, So, the following test should be done to confirm it’s quality.
CONSISTENCY TEST
- Choose one bag of sanla, Remove 2 trowels of sanla in one ghamela.
- Slowly add water to get a paste of proper consistency.
- Check this by rubbing between fingers. Good sanla will have a smooth feeling.
- Inferior sanla will not give a consistent paste and will be rough to touch. Such a lot should be rejected.
STRENGTH TEST
If the consistency is good, use the paste to prepare a 5cmm x 5cm x 5xm cube.
Allow it to set for 24 hours. Remove the cubes. The cubes should not crush easily into powder.
10. FLUSH DOORS
TEST FOR BENDING
Choose a flush door at random, Check that there is no bend or twist.
Place the shutters on the flat face, on raised. block pillars with no other support for 24 hours. Check for any bends. A good quality
the shutter will not bend.
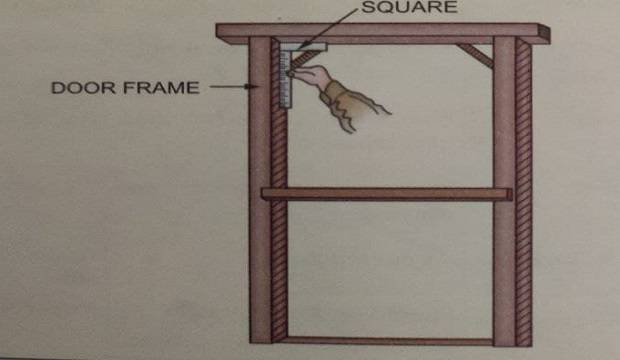
11. MATERIAL QUALITY TESTING AND REPORTING WOODEN DOOR FRAME
TEST FOR BENDING
Choose any door frame. Check that all the dimensions and diagonals are proper and there is no bend or twisting in its members. Check the rigidity of all the bracings that are provided.
Keep the door frame in a horízontal posítion on the supports raised by 60 cm above the ground level for 24 hours. Recheck for bending and diagonal etc. A good door frame will retain its shape without any changes.
12. MOSAIC TILES
WATER ABSORPTION TEST
- Choose three tiles at random.
- Take the initial weight and submerge them in water for 24 hours.
- Weigh the wet mosaic tiles and note down the difference in weight.
- Absorption = Difference in weight / Original weight X 100
- This should not be more than 10% for good-quality mosaic tiles.
TEST FOR STRENGTH
- Choose a mosaic tile and check it for any cracks or bends.
- Simply support the tile at four corners and apply the force in the middle and see the results.
- Well-cured tile will not break easily.
Also, Read This